Setup SCIM Provisioning
This page shows how to configure Appsmith for System for Cross-domain Identity Management (SCIM) to enable the automatic provisioning of users and groups based on your SSO provider.
Prerequisites
- A self-hosted Appsmith instance. See the installation guides for deploying Appsmith.
- Ensure that your Identity Provider (IdP) can reach the Appsmith SCIM API over HTTPS from its network. See HTTPS and network access.
- Appsmith only supports SCIM v2.0 for user and group provisioning. You must ensure that your Identity Provider (IdP) is compatible with SCIM v2.0.
- Google Workspace does not support SCIM, and integration cannot be configured within the platform. For more details, you can refer to the Google Workspace documentation.
HTTPS and network access
The main requirement for provisioning is reachability: your Identity Provider must be able to send HTTPS requests to the SCIM API endpoint and receive a valid response. Copy that URL from Admin Settings when you enable SCIM; it usually looks like https://<your-domain>/scim. The IdP must reach that URL from wherever it operates—its cloud region, data center, or corporate network—so outbound provisioning calls succeed.
Identity Providers initiate outbound HTTPS to your instance. SCIM is served on the same HTTPS endpoint as the rest of Appsmith—typically port 443 at your load balancer or reverse proxy—not a separate SCIM-only port.
On an internal or restricted network, you can narrow inbound HTTPS using firewall rules, security groups, or reverse proxy policies—for example, by allowing only IP ranges your IdP uses for provisioning (most vendors publish current ranges). The aim is to keep SCIM reachable without exposing the instance more than you need. These controls are optional; they are not an extra Appsmith-specific requirement for every deployment.
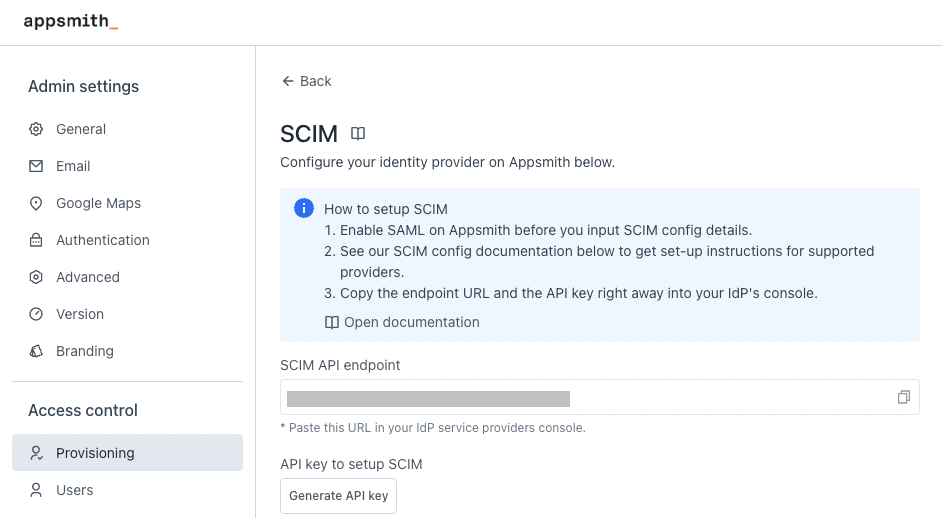
Enable SCIM provisioning on Appsmith
- On your instance, go to Admin Settings > Access Control and click Provisioning.
- On the User Provisioning & Group Sync page, click Configure.
- Copy the SCIM API endpoint URL to add it later in your IdP application.
- Under API key to setup SCIM, click the Generate API key button and copy the API key to add it later in your IdP application.
Configure identity provider
To complete the setup, go to your IdP application that is connected to Appsmith and follow the steps below:
- Active Directory
- Okta
-
On the Active Directory homepage, click Enterprise application on the sidebar and open the application that is already connected to Appsmith.
-
On the application Overview page, click Provisioning on the sidebar.
-
On the Provisioning homepage, click Provisioning on the sidebar and follow the steps below:
a. Select Automatic from the Provision Mode dropdown.
b. In the Tenant URL field, paste the SCIM API endpoint URL that you copied in Step 3 under Enable SCIM provisioning section.
c. In the Secret Token field, paste the API key that you copied in Step 4 under Enable SCIM provisioning section.
d. Click the Test Connection button to check if the added credentials are authorized to enable provisioning.
e. Expand the Mappings section, click Provision Azure Active Directory Users, and scroll down to Attribute Mappings to configure attributes for users. Delete all the attributes except the following:
- userPrincipalName
- displayName
- Switch([IsSoftDeleted], , "False", "True", "True", "False")
f. Click Save.
g. Go back to Mappings on the Provisioning page, click Provision Azure Active Directory Groups, and scroll down to Attribute Mappings to configure attributes for groups. Delete all the attributes except the following:
- displayName
- members
h. Click Save.
i. Go back to the Provisioning page, turn the toggle On for Provisioning status present at the bottom.
-
Go to the Overview page on the sidebar, and click the start provisioning button on the navigation bar.
-
Go to Users and Groups on the sidebar, and click Add user/group to add a user or group to your application. These users or groups get automatically synced and added to your Appsmith instance.
-
If you want to sync a user or group manually, go to the Provision on Demand from the sidebar, and enter a user or group name in the Select a user or group field.
-
On the Okta homepage, go to Applications > Applications on the sidebar, and open the application that is already connected to Appsmith.
-
On the application page, go to the General tab, click Edit on App Settings, and select the Enable SCIM provisioning checkbox. Click Save.
-
Go to the Provisioning tab, and click Edit on SCIM connection.
a. Paste the SCIM API endpoint URL that you copied in Step 3 under the Enable SCIM provisioning section in the SCIM connector base URL field.
b. In the Unique identifier field for users, enter
userName.c. In Supported provisioning actions, select the Push New Users, Push Profile Updates, and Push Groups checkboxes.
d. Select HTTP Header in the Authentication Mode dropdown.
e. In the HTTP Header section, paste the API key that you copied in Step 4 under the Enable SCIM provisioning section in the Authorization field.
f. Click Test Connector Configuration to test the connection.
g. Click Save.
-
In the Provisioning tab, go to Settings > to App.
a. Click Edit on the Provisioning to App section, and tick all the options. Click Save.
b. Scroll down to SCIM_test Attribute Mappings, and remove all the attributes except the following:
- Username
- Display name
-
Go to the Push Groups tab, click on the + Push Groups dropdown and select Find Group by name.
a. Enter the group name that you want to sync from Okta to your application.
b. Click Save to push the group or click Save & Add Another to save the current group and immediately add another one.
-
To assign the application to users or groups, go to the Assignments tab, click the Assign dropdown, and select Assign to People or Assign to Group as per requirement.
Once the setup is complete, refresh Appsmith in your browser, and the users and groups from your IdP provider sync in Appsmith. You can check the users and groups in Appsmith under Admin Settings > Access Control > Users/Groups.
All user and group updates must be performed on the Identity Provider (IdP) side only. Avoid making direct changes within Appsmith to prevent data discrepancies. For assistance or inquiries, contact the support team using the chat widget at the bottom right of this page.