Google Sheets
This page provides information for connecting Appsmith to Google Sheets and for reading and writing data in your applications.
Connection parameters
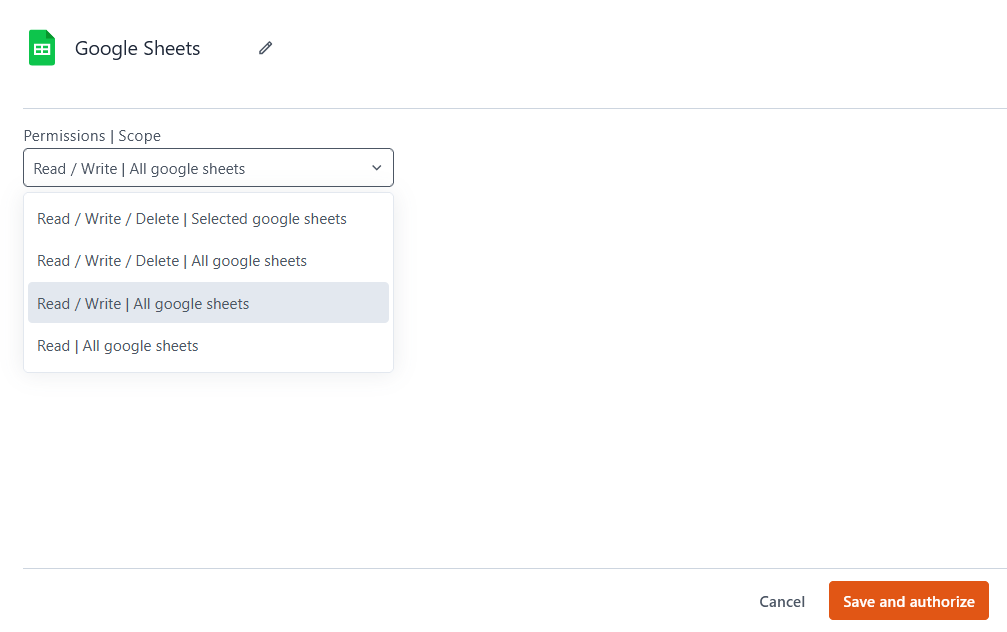
Permissions | Scope:
Options:
-
Read / Write / Delete | Selected Google Sheets: Your app has full access (read, write, and delete) only to the specific sheets you authorize. It can modify data, delete rows, remove sheets, and even delete entire spreadsheets, but only for the selected files.
-
Read / Write / Delete | All Google Sheets: Your app has full access to all spreadsheets in your Google account. This includes the ability to read and modify data, delete specific rows, remove entire sheets, and even delete entire spreadsheets.
-
Read / Write | All Google Sheets: Your app can read and modify all spreadsheets in your Google account but cannot delete entire sheets or spreadsheets. However, it can update cell values, modify rows, and clear data within sheets.
-
Read | All Google Sheets: Your app has read-only access to all spreadsheets in your Google account. It can fetch and display data but cannot make any modifications, including editing or deleting content.
Clicking Save and Authorize prompts you to log in to your Google account, where you can grant access and select the sheets your app can use.
Query Google Sheets
The following section is a reference guide that provides a complete description of all the parameters to connect to Google Sheets.
Fetch Details
This command fetches metadata for a given Spreadsheet entity. The following section lists all the fields available for the Fetch Details command.
Entity
- Spreadsheet: Returns metadata for a spreadsheet document.
Spreadsheet
Insert One
This command inserts a given entity type: Sheet Row(s) or Spreadsheet. The following section lists all the fields available for the Insert One command.
Entity
- Sheet Row(s): Inserts a single record as a row in the spreadsheet.
- Spreadsheet: Creates a new spreadsheet document. Optionally, use the Row Objects field to add rows during creation. The Spreadsheet option is available if the datasource has access to all spreadsheets. If access is restricted to selected sheets, the Spreadsheet option is disabled.
Spreadsheet
Sheet Name
Table Heading Row Index
Row Object
{
"name": {{ UserForm.name }},
"email": {{ UserForm.email }},
"status": "pending"
}
Row Objects
[{
  "name": "Kim",
  "email": "hkim@example.com",
  "status": "accepted"
},
{
"name": "Amal",
"email": "samal@example.com",
"status": "accepted"
}]
Update One
This command updates a Sheet Row(s) entity. The following section lists all the fields available for the Update One command.
Entity
- Sheet Row(s): Updates a single existing row in the spreadsheet.
Spreadsheet�
Sheet Name
Table Heading Row Index
The index of the row in your spreadsheet that contains the headings or labels for your table columns. The first row of the spreadsheet is index 1.
Update Row Object
rowIndex key to specify which record to update. If you fetched the record from another Google Sheets query, this index value should be available on its rowIndex property.Example:
//For JSON Form: {{JSONForm1.formData.id}}
//For Table inline editing: {{ Table1.updatedRow.id }}

{{
    {
        rowIndex: Table1.selectedRow.rowIndex, // includes rowIndex key
        "id": Form1.data.TextID,
        "name": Form1.data.InputName,
        "country": Form1.data.SelectCountry

    }
}}
See Update single row guide.
Delete One
This command deletes a given entity: Sheet Row(s), Spreadsheet, or Sheet. The following section lists all the fields available for the Delete One command.
Entity
- Sheet Row(s): Deletes a single row of a spreadsheet.
- Spreadsheet: Deletes a new spreadsheet document.
- Sheet: Deletes a page from a spreadsheet document.
Spreadsheet
Sheet Name
Row Index
rowIndex property.Fetch Many
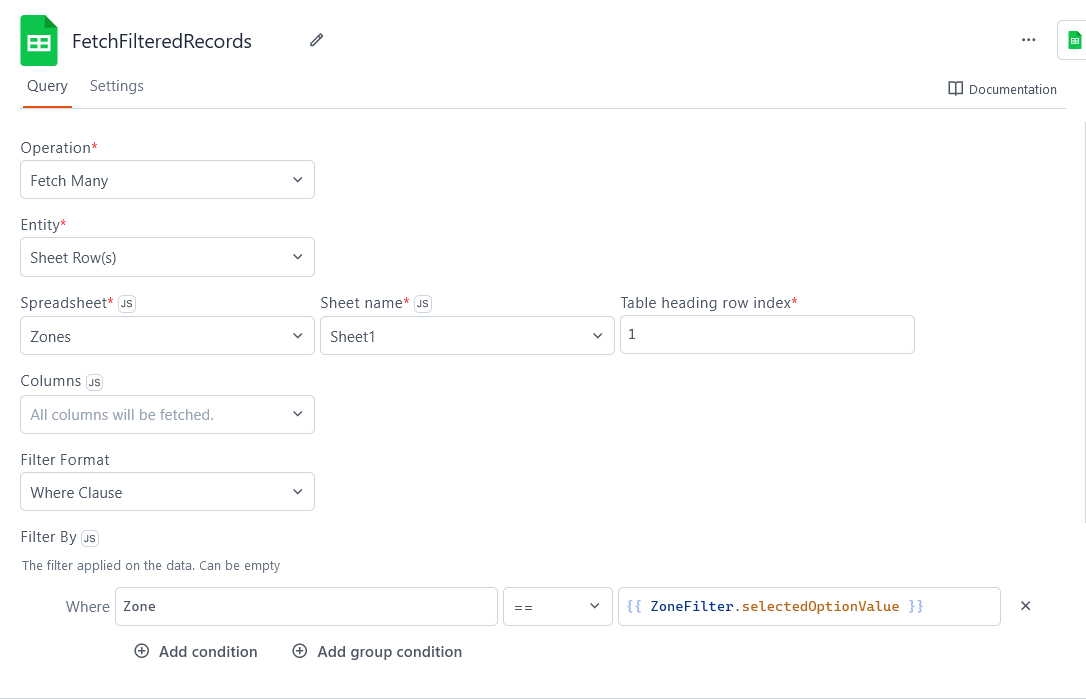
This command fetches a given entity type: Sheet Row(s) or Spreadsheet. The following section lists all the fields available for the Fetch Many command.
Entity
- Sheet Row(s): Fetches a subset of horizontal records from a page of a spreadsheet document.
- Spreadsheet: Fetches a list of existing spreadsheet documents.
Spreadsheet
Sheet Name
Table Heading Row Index
The index of the row in your spreadsheet that contains the headings or labels for your table columns. The first row of the spreadsheet is index 1.
Filter Format
Sets the method of selecting records from your spreadsheet.
- Where Clause: Fetches records based on logic and conditions. This also allows you to sort and paginate your results.
- Cell Range: Fetches a block of spreadsheet cells defined by spreadsheet-style notation, such as
A2:B7.
The following settings are available when Filter Format is set to Where Clause:
Filter By
in, not in, contains, and logic operators.- Add Condition: Adds another simple single-line expression.
- Cell Range: Adds a nested expression with multiple levels of And/Or statements.
Sort By
- Add Parameter: Adds another column for sorting on multiple levels.
Pagination Limit
Pagination Offset
The following setting is available when Filter Format is set to Cell Range:
Cell Range
A1-B14) to select cells. Even when the column header row isn't part of your selection, your fetched data still includes the column labels for your selected cells. This mode doesn't allow conditions, sorting, or pagination.See how-to guide on Fetch and Filter Data from Google Sheets.
Insert Many
This command inserts multiple Sheet Row(s) entities. The following section lists all the fields available for the Insert Many command.
Entity
- Sheet Row(s): Inserts several records as a rows in the spreadsheet.
Spreadsheet
Sheet Name
Table Heading Row Index
The index of the row in your spreadsheet that contains the headings or labels for your table columns. The first row of the spreadsheet is index 1.
Row Objects
[{
  "name": "Kim",
  "email": "hkim@example.com",
  "status": "accepted"
},
{
"name": "Amal",
"email": "samal@example.com",
"status": "accepted"
}]
See how-to guide on Insert and Update Data in Google Sheets.
Update Many
This command updates multiple Sheet Row(s) entities. The following section lists all the fields available for the Update Many command.
Entity
- Sheet Row(s): Updates multiple existing rows in the spreadsheet.
Spreadsheet
Sheet Name
Table Heading Row Index
The index of the row in your spreadsheet that contains the headings or labels for your table columns. The first row of the spreadsheet is index 1.
Update Row Object(s)
rowIndex key in each row object to specify which record to update in the spreadsheet. Note that the rowIndex property of your row objects in Appsmith refers to its index in the array of table records, not the record's row number in the Google spreadsheet.Example:
{{
        Table1.updatedRows.map(row => {    // includes rowIndex key in each object
            return row.allFields
        })
 }}
See Update multiple rows guide.
Troubleshooting
If you are experiencing difficulties, you can refer to the Datasource troubleshooting guide or contact the support team using the chat widget at the bottom right of this page.
See also
- Fetch and Filter Data from Google Sheets - Learn how to retrieve and filter data from Google Sheets∂.
- Insert and Update Data in Google Sheets - Guide on how to insert new records and update existing data in Google Sheets.