High Availability on Google Cloud Run
High availability ensures that your Appsmith instance remains accessible without interruption, even during system disruptions. This page outlines the steps required to set up high availability for your Appsmith installation on Google Cloud Run.
Prerequisites
Before setting up high availability for Appsmith, ensure you have completed the following:
-
You need to have Appsmith Commercial Edition installed on Google Cloud Run. If not already installed, refer to the Google Cloud Run installation guide. This guide assumes you are working with an existing installation.
-
A Google Cloud account with the required permissions to manage Cloud Run, Cloud SQL, and related resources.
-
Appsmith installation on Google Cloud Run operates in an isolated environment, which limits external access to the container for automated backup and restore. Ensure you take a manual backup of your data.
-
Enable the Cloud SQL Admin API and Memorystore for Redis API in your Google Cloud project.
-
Ensure you've assigned
Cloud SQL Adminand theCloud SQL Clientroles to your Google Cloud project.
Set up external databases
High availability for Appsmith relies on correctly configured external databases. Follow the steps for each database to set up persistent, scalable environments.
Configure MongoDB
Appsmith requires MongoDB to store application data. To use an external MongoDB instance with Appsmith, follow the steps below to back up your data, configure the new MongoDB instance, and restore your Appsmith data if needed.
-
Take a backup of your existing MongoDB instance before proceeding. For more information, see How to take back up of MongoDB data guide.
-
If you don't already have a MongoDB instance, create a new one. You can either use an existing instance or set up a new one through your infrastructure or a cloud provider like MongoDB Atlas.
-
Log in to your MongoDB instance as an admin user. Then, run the following command to initiate the replica set configuration:
rs.initiate() -
Assign or verify that the MongoDB user account Appsmith uses has
readWriteandclusterMonitorroles assigned. -
Restore your Appsmith backup you took earlier to the new MongoDB instance. For more information, see the Restore database guide.
-
Once your MongoDB setup is complete, note down the connection string as you’ll need it in the Configure High Availability section.
Configure Redis
Appsmith relies on Redis for caching and session storage. Set up a Redis instance using Google Cloud Memorystore. Follow these steps:
- Go to the Memorystore for Redis page in the Google Cloud console.
- Click Create Instance.
- On the Create a Redis instance page, enter the configurations as shown below:
- Instance ID: Provide a unique name for your Redis instance. For exmaple,
appsmith-redis. - Tier: Select the Standard tier for High Availability, which provides automatic failover to a replica in case the primary node fails. For more details on tiers, see Redis Tier Capabilities.
- Capacity: Set a minimum of
10(GB), or adjust based on your needs. - Region: Choose the region where your Appsmith instance is located.
- Zone: Select a zone for your instance.
- Configure read replicas: Select
2 Read Replicasif using the Standard tier to ensure high availability.
- Instance ID: Provide a unique name for your Redis instance. For exmaple,
- Under Set up connection, choose the default option for Network.
- Expand the Configuration section and select 6.x (recommended) for the Redis version.
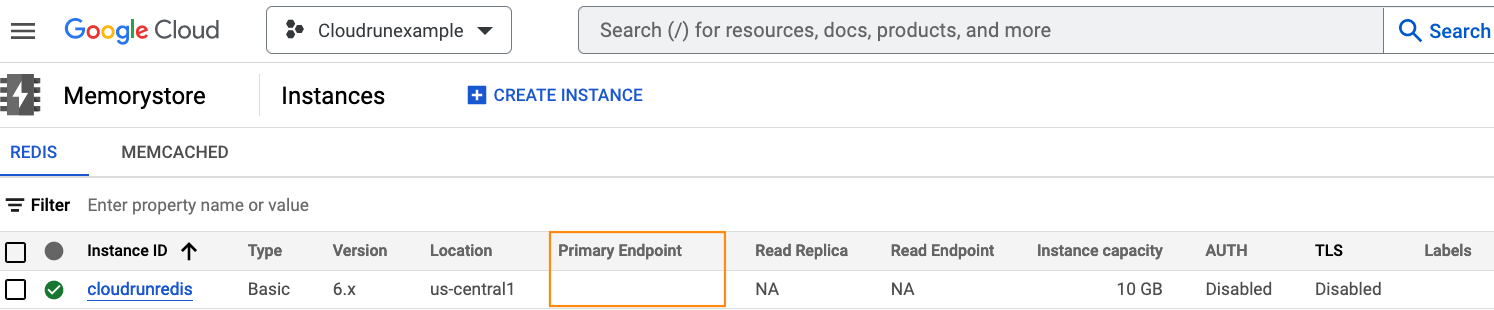
- Click the Create button to deploy the Redis instance.
- Once the instance is ready, note down the Primary Endpoint, as this will be used later in your Appsmith configuration.
Configure PostgreSQL (optional)
If you want to integrate Single Sign-on provider using SAML on Appsmith, you'll have to set up a PostgreSQL RDS instance for Keycloak. Follow these steps to create a PostgreSQL RDS instance for your Appsmith installation on Google Cloued Run:
Create PostgreSQL instance
Follow these steps to create a PostgreSQL instance using Google Cloud SQL:
- In the Google Cloud console, go to the Cloud SQL Instances page.
- Click Create instance.
- On the Choose your database engine panel, click Choose PostgreSQL.
- Add below details to set up the instance:
- Instance ID: Provide a unique name for your PostgreSQL instance. For example,
appsmith-postgres. - Password: Enter a password for the
postgresuser. - Database version: Select PostgreSQL 12 from the dropdown list.
- Cloud SQL edition: Select Enterprise.
- Region: Choose the region for your instance, ideally the same region as your Appsmith deployment.
- Zonal availability: Select Single zone.
- Instance ID: Provide a unique name for your PostgreSQL instance. For example,
- In the Customize your instance section, click SHOW CONFIGURATION OPTIONS to display the settings.
- Under Storage:
- Select HDD for the storage type.
- Set Storage capacity to at least 10 GB.
- Under Connections:
- Select Public IP to allow connections.
- Under Data protection:
- Deselect Automate daily backups and Enable deletion protection.
- Under Maintenance:
- Select Any window in the Maintenance window dropdown.
- Choose Any in the Order of update dropdown.
- Click Create Instance.
Create database
- In the Google Cloud console, go to the Cloud SQL Instances page.
- Click on the instance name to open its Overview page.
- In the SQL navigation menu, select Databases.
- Click Create database.
- Enter a name for the database. For example,
appsmith-db. - Click Create to create the database.
Create users
- In the Google Cloud console, go to the Cloud SQL Instances page.
- Open the Overview page of your instance by clicking the instance name.
- In the SQL navigation menu, select Users.
- Click Add user account.
- In the Add a user account dialog:
- Set the Username and Password for the new user.
- Choose Built-in authentication (default).
- Click Add to create the user.
Once the PostgreSQL instance is set up, you'll need to record the following details:
- Public IP address.
- Database name. For example,
appsmith-db. - Username and Password you created.
You need these details while configuring Appsmith to connect to the PostgreSQL database.
Configure high availability
After setting up external databases, configure Appsmith on Google Cloud Run for redundancy and reliability.
Deploy new revision
-
Open the Google Cloud Run console and select your Appsmith service.
-
Click EDIT & DEPLOY NEW REVISION.
-
Add the following environment variables:
APPSMITH_DB_URL=<MongoDB connection string>: Use the connection string for your MongoDB database, configured during its setup.APPSMITH_REDIS_URL=<Redis connection string>: Use the Redis connection string or endpoint provided after setting up your Redis instance on AWS ElastiCache.APPSMITH_KEYCLOAK_DB_URL=<PostgreSQL endpoint>: This should be the endpoint of the PostgreSQL database you set up for Keycloak.APPSMITH_KEYCLOAK_DB_DRIVER=postgresql: Set the driver topostgresqlas Keycloak uses PostgreSQL for its database.APPSMITH_KEYCLOAK_DB_USERNAME=<PostgreSQL username>: Enter the username you configured during the PostgreSQL setup.APPSMITH_KEYCLOAK_DB_PASSWORD=<PostgreSQL password>: Use the password you created for the PostgreSQL user.KC_TRANSACTION_XA_ENABLED=false: To disable the XA transactions in your Keycloak setup.
-
Remove the
APPSMITH_DISABLE_EMBEDDED_KEYCLOAKenvironment variable by clicking the delete icon next to the environment variable value. -
Under the Cloud SQL connections section.
-
Click Add connection.
-
Select the desired Cloud SQL instance from the dropdown list.
-
Click the Security tab. In the Service account dropdown list, select the account where you granted the Cloud SQL Admin and the Cloud SQL Client roles.
-
Scroll down to the bottom of the page, and uncheck the Serve this revision immediately checkbox.
-
Click Deploy button. A green check mark appears next to the newly deployed revision when it's ready.
Manage traffic
- Locate the service in the services list, and click it.
- Click the Revisions tab.
- Click the MANAGE TRAFFIC button.
- Select the revisions that you created as part of Deploy new revision section.
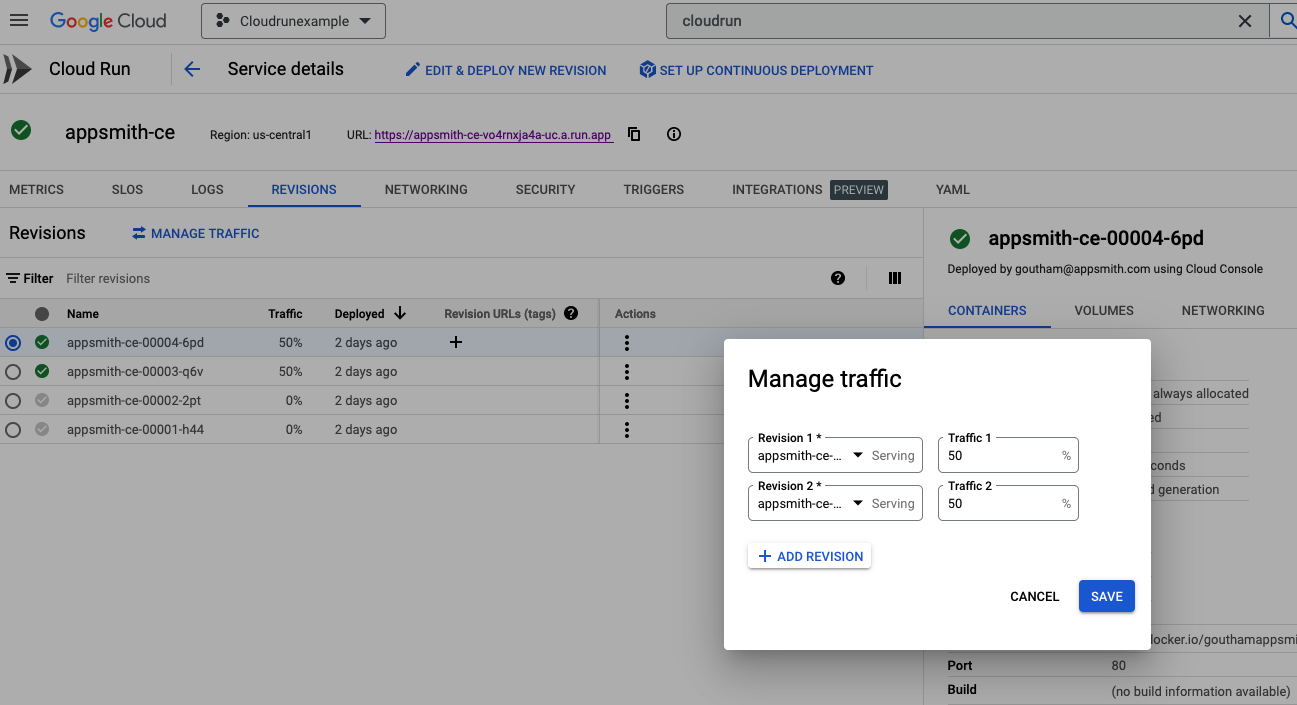
- Specify the traffic percentage that you want to assign to each revision.
- Click Save.
Verify high availability
Perform the following checks:
- Access Appsmith and confirm its functionality under normal conditions.
- Simulate failover scenarios by disabling one of the running instances. Confirm that the remaining instances continue serving traffic.
- Monitor the Logs in the Cloud Run console for any errors.
Troubleshooting
If you encounter issues, follow these steps:
- Verify the connection strings and ensure the databases are accessible.
- Check Cloud Run logs for detailed error messages.
If you continue facing issues, contact support using the chat widget available in the bottom-right corner of this page.
See also
- SAML Single Sign-On: Learn how to configure SAML-based Single Sign-On (SSO) for secure authentication in your Appsmith instance.