DynamoDB
This page provides information for connecting your application to your DynamoDB database and for using queries to manage its content.
Connect DynamoDB
If you are a cloud user, you must whitelist the IP addresses 18.223.74.85 and 3.131.104.27 of the Appsmith deployment on your database instance before connecting to your database. Create an IAM Policy with a condition statement to allow these IP addresses. To learn more, see IP address condition operators.
Connection parameters
The following section is a reference guide that provides a complete description of all the parameters to connect to a DynamoDB database.
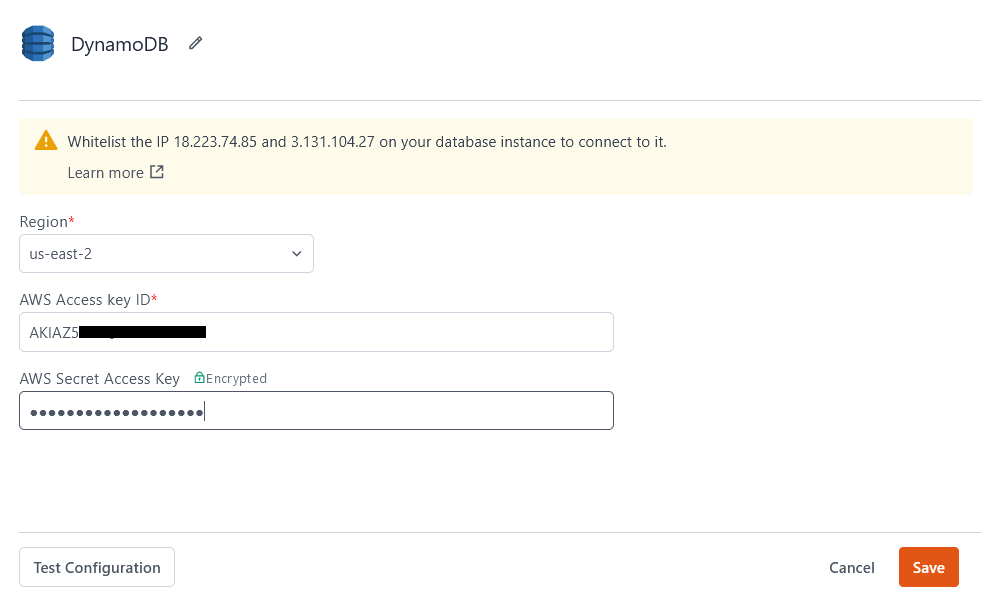
Region
The region where your DynamoDB instance is hosted.
AWS Access Key ID
The AWS access key used to identify your IAM user for DynamoDB. Be sure to use the access key for your IAM user with the set of privileges you want your Appsmith app to have. For more information on using an AWS access key, see Create Access Key.
AWS Secret Access Key
The secret value used to authenticate your queries to DynamoDB. This value is accessible from your AWS security credentials page. To learn more about your AWS Secret Key, see the AWS Security Blog.
Create queries
The following section is a reference guide that provides a complete description of all the read and write operation commands with their parameters to create DynamoDB queries.
For more details about any of the operations below, see the Amazon DynamoDB Actions documentation.
See Setup Server-Side Pagination on Table.
BatchGetItem
This operation fetches many specific records by their partition and sort keys. For example, the following fetches two specific records by their sort and partition keys:
{
    "RequestItems": {
        "users": {
            "Keys": [
                {
                    "team_id": {
                        "S": "team_1"
                    },
                    "employee_id": {
                        "S": "emp_1"
                    }
                },
                {
                    "team_id": {
                        "S": "team_3"
                    },
                    "employee_id": {
                        "S": "emp_4"
                    }
                }
            ]
        }
    }
}
BatchWriteItem
This operation creates and deletes multiple items in one or more tables. For example, the following creates a new record and deletes an existing one:
{
    "RequestItems": {
        "users": [
            {
                "PutRequest": {
                    "Item": {
                        "team_id" : {
                            "S" : "team_1"
                        },
                        "employee_id": {
                            "S" : "emp_1"
                        },
                        "name": {
                            "S" : "Aman"
                        }
                    }
                }
            },
            {
                "DeleteRequest": {
                    "Key" : {
                        "team_id" : {
                            "S" : "team_1"
                        },
                        "employee_id" : {
                            "S" : "emp_3"
                        }
                    }
                }
            }
        ]
    }
}
CreateBackup
This operation creates a backup with a given name of an entire table. For example, the following creates a backup of the table users under the name usersBackup:
{
    "BackupName": "usersBackup",
    "TableName": "users"
}
CreateGlobalTable
This operation creates a global table from an existing table. A global table creates a replication relationship between two or more DynamoDB tables that share a name in the specified Regions. For example, the following creates a global replica of the users table in the us-east-1 region:
{
    "GlobalTableName": "users",
    "ReplicationGroup": [
        {
            "RegionName": "us-east-1"
        }
    ]
}
CreateTable
This operation creates a new DynamoDB table. For example the following creates a table called users with three columns, where team_id is the partition key and emp_id is the sort key:
{
    "AttributeDefinitions": [
        {
            "AttributeName": "name",
            "AttributeType": "S"
        },
        {
            "AttributeName": "emp_id",
            "AttributeType": "S"
        },
        {
            "AttributeName": "team_id",
            "AttributeType": "S"
        }
    ],
    "TableName": "users",
    "KeySchema": [
        {
            "AttributeName": "team_id",
            "KeyType": "HASH" // partition key
        },
        {
            "AttributeName": "emp_id",
            "KeyType": "RANGE" // sort key
        }
    ],
    "ProvisionedThroughput": {
        "ReadCapacityUnits": 5,
        "WriteCapacityUnits": 5
    }
}
DeleteBackup
This operation deletes an existing backup of a table. The backup is identified by its Amazon Resource Name (ARN), which you can find with a ListBackups query.
For example, the following deletes a backup with ARN arn:aws:dynamodb:us-east-2:123456789012:table/users:
{
    "BackupArn": "arn:aws:dynamodb:us-east-2:123456789012:table/users"
}
DeleteItem
This operation deletes an existing record, identified by its primary and sort keys. For example, the following deletes a record with keys team_id = team_1 and employee_id = emp_3 from the table users:
{
    "TableName" : "users",
    "Key" : {
        "team_id" : {
            "S" : "team_1"
        },
        "employee_id" : {
            "S" : "emp_3"
        }
    }
}
For information on how to delete data in a Table, see Delete Data in Table.
DeleteTable
This operation deletes an existing table. For example, the following deletes an existing table users:
{
    "TableName": "users"
}
DescribeBackup
This operation returns metadata about an existing table backup. The backup is identified by its Amazon Resource Name (ARN), which you can find with a ListBackups query. For example, the following returns information about a backup with ARN arn:aws:dynamodb:us-east-2:123456789012:table/users:
{
    "BackupArn": "arn:aws:dynamodb:us-east-2:123456789012:table/users"
}
DescribeContinuousBackups
This operation checks the status of continuous backups and point in time recovery on the specified table. For example, the following checks the status of a table users:
{
    "TableName": "users"
}
DescribeContributorInsights
This operation returns information about contributor insights for a given table or global secondary index. For example, the following returns contributor insights for a table users:
{
    "TableName": "users"
}
DescribeEndpoints
This operation returns information about your regional AWS endpoint. This request must be sent with an empty body.
DescribeGlobalTable
This operation returns information about a given global table, identified by its name. For example, the following returns information about a global table users:
{
    "GlobalTableName": "users"
}
DescribeGlobalTableSettings
This operation returns information about the region-specific settings of a global table, identified by its name. For example, the following returns settings data about a global table users:
{
    "GlobalTableName": "users"
}
DescribeLimits
This operation returns the current provisioned capacity quotas for your AWS account in a region, both for the region as a whole and for any one DynamoDB table in that region. This request must be sent with an empty body.
DescribeTable
This operation returns information about a given table, identified by its name. For example, the following returns information about a table users:
{
    "TableName": "users"
}
DescribeTableReplicaAutoScaling
This operation returns information about the auto scaling settings of all replicas of a given global table, identified by its name. For example, the following shows the auto scaling settings for replicas of a global table users:
{
    "TableName": "users"
}
DescribeTimeToLive
This operation returns information about the Time to Live (TTL) status of a given table, identified by its name. For example, the following shows the TTL status for a table users:
{
    "TableName": "users"
}
GetItem
Use this operation when you want one specific record, and you know its partition and sort keys. For example, the following returns a record where team_id = "team_1" and employee_id = "emp_1":
{
    "TableName": "users",
    "Key": {
        "team_id": "team_1",
        "employee_id": "emp_1"
    }
}
ListBackups
This operation returns a list of DynamoDB backups associated with your AWS account. The results can be filtered to certain tables or time ranges. For example, the following returns a list of all backups of a table users:
{
    "BackupType": "ALL",
    "TableName": "users"
}
ListContributorInsights
This operation returns a list of ContributorInsightsSummary entries for a table and all of its global secondary indexes. For example, the following returns a list of ContributorInsightsSummary entries for a table users:
{
    "TableName": "users"
}
ListGlobalTables
This operation returns a list of your global tables that have a replica in the specified region. For example, the following returns a list of global tables for the region us-east-1:
{
    "RegionName": "us-east-1"
}
ListTables
This operation returns an array of table names that are associated with your AWS account and endpoint. This request does not require a body, however there are optional parameters available for pagination.
ListTagsOfResource
This operation returns a list of all tags for a given DynamoDB resource, identified by its Amazon Resource Name (ARN). For example, the following returns a list of tags for a resource with ARN arn:aws:dynamodb:us-east-2:123456789012:table/users:
{
    "ResourceArn": "arn:aws:dynamodb:us-east-2:123456789012:table/users"
}
PutItem
This operation creates a new item or replaces an old item with a new one. If an item with the same primary key already exists in the table, the new item completely replaces the existing item. For example, the following creates or replaces an item in a table users where the partition key is team_id = "team_1" and the sort key is employee_id = "emp_1":
{
    "TableName": "users",
    "Item": {
        "team_id" : {
            "S" : "team_1"
        },
        "employee_id": {
            "S" : "emp_1"
        },
        "name": {
            "S" : "Aman"
        }
    }
}
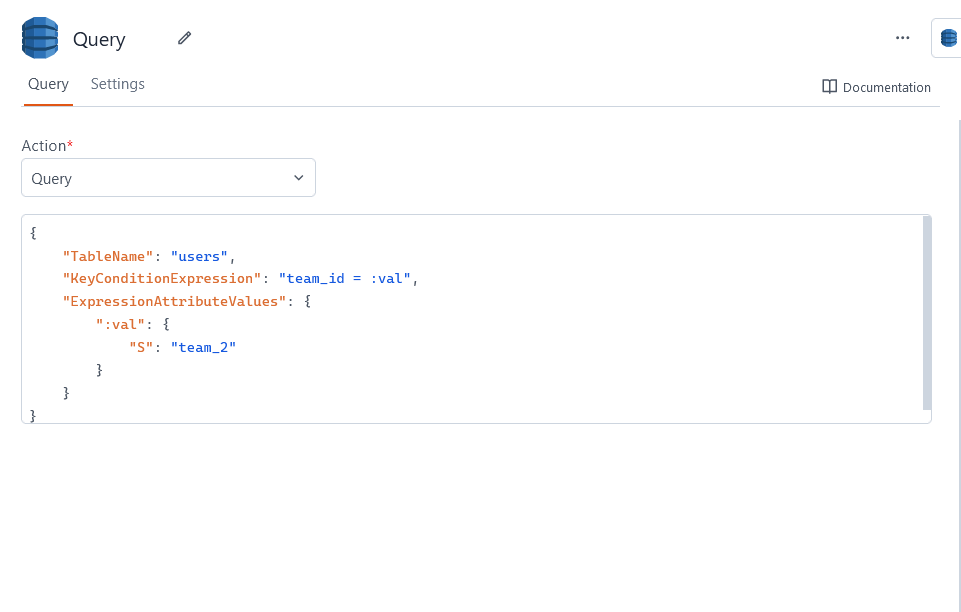
Query
This operation fetches records that share a partition key based on a filter condition. For example, the following returns all records with partition key team_id = "team_2":
{
    "TableName": "users",
    "KeyConditionExpression": "team_id = :val",
    "ExpressionAttributeValues": {
        ":val": {
            "S": "team_2"
        }
    }
}
RestoreTableFromBackup
This operation creates a new table from an existing backup, identified by its Amazon Resource Name (ARN). For example, the following creates a new table usersRestored from a backup with ARN arn:aws:dynamodb:us-east-2:123456789012:table/users:
{
    "BackupArn": "arn:aws:dynamodb:us-east-2:123456789012:table/users",
    "TargetTableName": ""
}
RestoreTableToPointInTime
This operation creates a new table that is a restoration of a given table from a given point in time. The point in time is a timestamp that must be between 5 minutes and 35 days prior to the time of the request. For example, the following creates a new table usersRestored from the state of an original table users at a specific time:
{
    "RestoreDateTime": 1691100258,
    "SourceTableName": "users",
    "TargetTableName": "usersRestored"
}
Scan
This operation searches an entire table and returns records based on a filter condition. Scanning a table accesses every one of its records, and could result in lengthy response times and increased costs on large datasets. For example, the following query returns every record in the users table:
{
    "TableName": "users"
}
The following query checks every record in the users table and returns records where its name is Anneke:
{
    "TableName": "users",
    "FilterExpression": "#n = :val",
    "ExpressionAttributeNames": { // "name" is a reserved keyword, so this key sets an alias
        "#n": "name"
    },
    "ExpressionAttributeValues": {
        ":val": {
            "S": "Anneke"
        }
    }
}
TagResource
This operation associates a set of tags with a DynamoDB resource, identified by its Amazon Resource Name (ARN). For example, the following associates a department key-value pair as a tag on a table users:
{
    "ResourceArn": "arn:aws:dynamodb:us-east-2:123456789012:table/users",
    "Tags": [
        {
            "Key": "department",
            "Value": "marketing"
        }
    ]
}
TransactGetItems
This operation retrieves multiple items from one or more tables in a single account and region. The request contains a TransactItems array, where each element describes a single Get operation. If any of the operations within the transaction fail, then the entire query is rejected and no data is returned. For example, the following fetches an item from a table users and another item from a table locations:
{
    "TransactItems": [
        {
            "Get": {
                "TableName": "users",
                "Key" : {
                    "team_id" : {
                        "S" : "team_1"
                    },
                    "employee_id" : {
                        "S" : "emp_1"
                    }
                },
            }
        },
        {
            "Get": {
                "TableName": "locations",
                "Key" : {
                    "name" : {
                        "S" : "Main Office"
                    },
                    "address" : {
                        "S" : "123 Maple St."
                    }
                },
            }
        }
    ]
}
TransactWriteItems
This operation retrieves multiple items from one or more tables in a single account and region. The request contains a TransactItems array, where each element describes a single Get operation. If any of the operations within the transaction fail, then the entire query is rejected and no data is returned. For example, the following fetches an item from a table users and another item from a table locations:
{
    "TransactItems": [
        {
            "Put": {
                "TableName": "string",
                "Item": {
                    "string" : {
                        "S": "string",
                    }
                },
            }
        },
        {
            "Delete": {
                "TableName": "string",
                "Key": {
                    "team_id" : {
                        "S": "team_2",
                    },
                    "employee_id": {
                        "S": "emp_2"
                    }
                },
            }
        },
    ]
}
UntagResource
This operation removes a set of tags from a DynamoDB resource, identified by its Amazon Resource Name (ARN). For example, the following removes a { "department": "billing" } tag from a table users:
{
    "ResourceArn": "arn:aws:dynamodb:us-east-2:123456789012:table/users",
    "TagKeys": ["department"]
}
UpdateContinuousBackups
This operation turns point in time recovery on or off for the specified table. For example, the following turns continuous backups off for a table users:
{
    "PointInTimeRecoverySpecification": {
        "PointInTimeRecoveryEnabled": false
    },
    "TableName": "users"
}
UpdateContributorInsights
This operation updates the status for contributor insights for a given table or index. This query requires the name of the table to update and an "ENABLE" or "DISABLE" value that turns ContributorInsightsAction on or off. For example, the following turns contributor insights off for a table users:
{
    "ContributorInsightsAction": "DISABLE",
    "TableName": "users"
}
UpdateGlobalTable
This operation adds or removes replicas in a given global table. The global table must already exist, and any replica to be added must be empty, have the same name as the global table, have the same key schema, have DynamoDB Streams enabled, and have the same provisioned and maximum write capacity units. For example, the following adds a replica table of global table users in us-east-1 and removes a replica in us-west-1:
{
    "GlobalTableName": "users",
    "ReplicaUpdates": [
        {
            "Create": {
                "RegionName": "us-east-1"
            },
            "Delete": {
                "RegionName": "us-west-1"
            }
        }
    ]
}
For more information on how to update Table data, see Update Data Guide.
UpdateGlobalTableSettings
This operation updates settings for an existing global table. For example, the following updates a global table users so that the GlobalTableBillingMode is "PROVISIONED":
{
    "GlobalTableName": "users",
    "GlobalTableBillingMode": "PROVISIONED"
}
UpdateItem
This operation edits an existing item's attributes or adds a new item to the table if it does not already exist. For example, the following changes the name of a record in the table users:
{
    "TableName" : "users",
    "Key" : {
        "team_id" : {
            "S" : "team_1" // partition key
        },
        "employee_id" : {
            "S" : "emp_1" // sort key
        }
    },
    "UpdateExpression" : "set name = Amal"
}
UpdateTable
This operation modifies the throughput settings, global secondary indexes, or DynamoDB Streams settings for an existing table. For example, the following turns on deletion protection for a table users:
    {
        "TableName": "users",
        "DeletionProtectionEnabled": true
    }
UpdateTableReplicaAutoScaling
This operation updates auto scaling settings on your global tables. For example, the following turns on provisioned write capacity auto scaling for a table users:
{
    "ProvisionedWriteCapacityAutoScalingUpdate": [
        {
            "AutoScalingDisabled": false
        }
    ],
    "TableName": "users"
}
Troubleshooting
If you are experiencing difficulties, you can refer to the Datasource troubleshooting guide or contact the support team using the chat widget at the bottom right of this page.
See also
- Display and Lookup Data in Table - Learn how to display query results in a Table and enable users to look up data with ease.
- Search and Filter Table Data - Guide on adding search and filter functionality to Tables for better data navigation.
- Update Data - Understand how to update data in your application using Form widget.
- Insert Data - Step-by-step instructions on inserting new records into your database using Form widget.