Microsoft SQL Server (MS SQL)
This page provides information for connecting your application to your MS SQL database and using queries to manage its content.
Appsmith's backend server supports TLS1.1 and TLS1.2 for connecting to endpoints.
Connect MS SQL
If you are a cloud user, you must whitelist the IP addresses 18.223.74.85 and 3.131.104.27 of the Appsmith deployment on your database instance before connecting to your database.
Connection parameters
The following section is a reference guide that provides a complete description of all the parameters to connect to a MS SQL database.
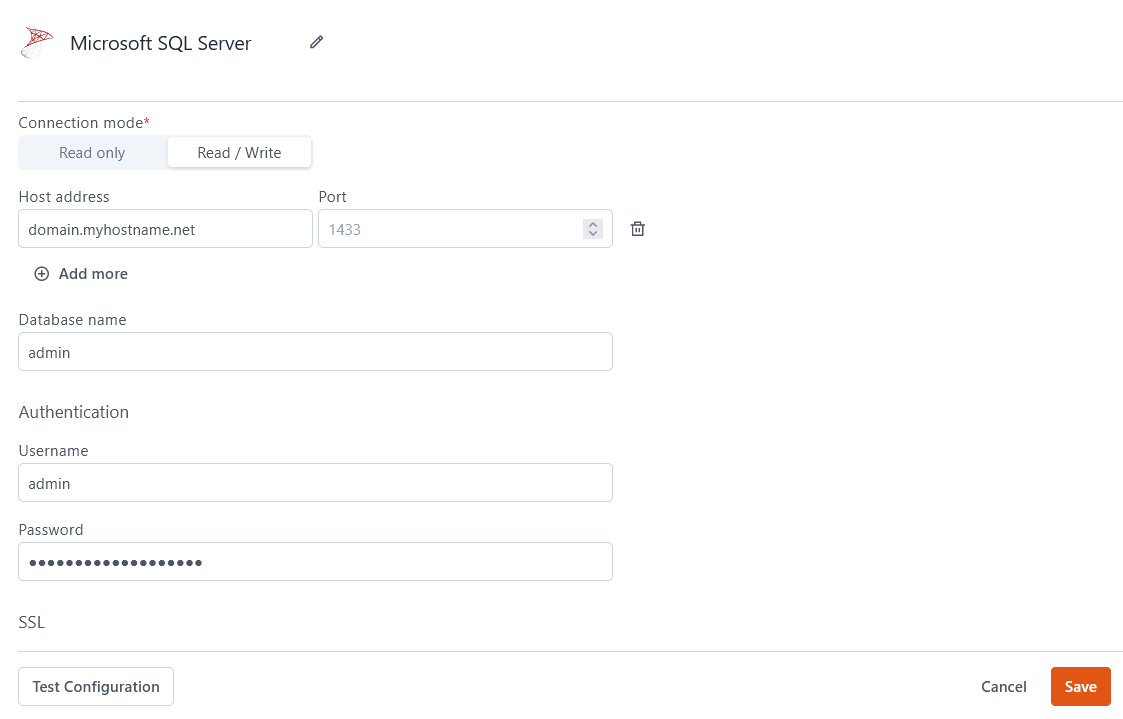
Connection mode
- Read Only: Gives Appsmith read-only permission on the database. Use this mode when you only need to fetch records, not write them.
- Read / Write: Gives Appsmith both read and write permissions on the database. This allows you to make changes to your data via all CRUD queries.
Host Address
Port
1433 by default if you do not specify one.Database Name
Username
Password
SSL mode
- Enabled with no verify: The connection is encrypted but no client verification is done.
- Disabled: Disables SSL completely, and all connections are established without encryption.
Query MS SQL
The following section provides examples of creating basic CRUD queries for MS SQL.
You can query MS SQL databases using T-SQL syntax. Refer to Microsoft's documentation to learn how to Write Transact-SQL statements.
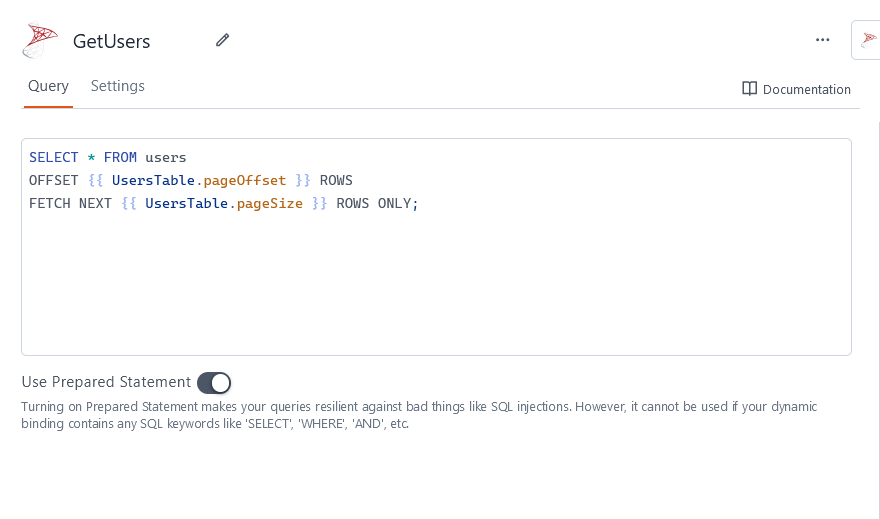
Fetch data
SELECT * FROM users
OFFSET {{ UsersTable.pageOffset }} ROWS
FETCH NEXT {{ UsersTable.pageSize }} ROWS ONLY;
In the above example, UsersTable is the name of the Table widget used to display the data using server-side pagination to control how much data is queried at once.
Insert data
INSERT INTO users
  (name, gender, email)
VALUES
(
  {{ NameInput.text }},
  {{ GenderDropdown.selectedOptionValue }},
  {{ EmailInput.text }}
);
In the above example, NameInput, GenderDropdown, and EmailInput are the names of the widgets used to capture input from the user for name, gender, and email fields, respectively.
Update data
UPDATE users
  SET email = {{ EmailInput.text }}
  WHERE id = {{ UsersTable.selectedRow.id }};
In the above example, EmailInput is the name of the Input widget used to capture the email entered by the user. UsersTable is the Table widget where the user selects the row to update the user's email.
Delete data
DELETE FROM users WHERE id = {{ UsersTable.selectedRow.id }};
In the above example, UsersTable is the name of the Table widget where the user selects the row for deletion.
Prepared statements are turned on by default in your queries to help prevent SQL injection attacks. For more details, see Prepared Statements.
Troubleshooting
If you are experiencing difficulties, you can refer to the Datasource troubleshooting guide or contact the support team using the chat widget at the bottom right of this page.
See also
- Display and Lookup Data in Table - Learn how to display query results in a Table and enable users to look up data with ease.
- Search and Filter Table Data - Guide on adding search and filter functionality to Tables for better data navigation.
- Update Data - Understand how to update data in your application using Form widget.
- Insert Data - Step-by-step instructions on inserting new records into your database using Form widget.