Integrate Custom Authentication
This guide walks you through the process of building custom authentication and integrating your Appsmith applications with any authentication provider.
Prerequisites
- An API endpoint for user sign-in.
- A configured authentication service with user credentials to integrate with Appsmith.
Set up sign-in flow
To secure your Appsmith application, you will need to set up a sign-in flow that requires users to authenticate before accessing the app. Follow these steps to create the sign-in flow:
-
Drop a Form widget to your app and design a login screen by adding the Input widgets for username and password.
-
Create a new REST API query that contains user details including the access token. Set the request type to POST.
Example:
https://example.api.co/auth/v1/token?grant_type=passwordReplace the above with your API endpoint.
-
Pass the user credentials from the login form to you API in the expected format. For example, to pass the data in JSON format, select Body in the API, and then select JSON. Bind the values entered in the login Form using the following code where
usernameandpasswordare the input widgets:{
"email": {{inp_username.text}},
"password": {{inp_password.text}}
} -
Select the Menu icon (three dots) in the login screen, and then select Set as home page to set the login screen as the home screen.
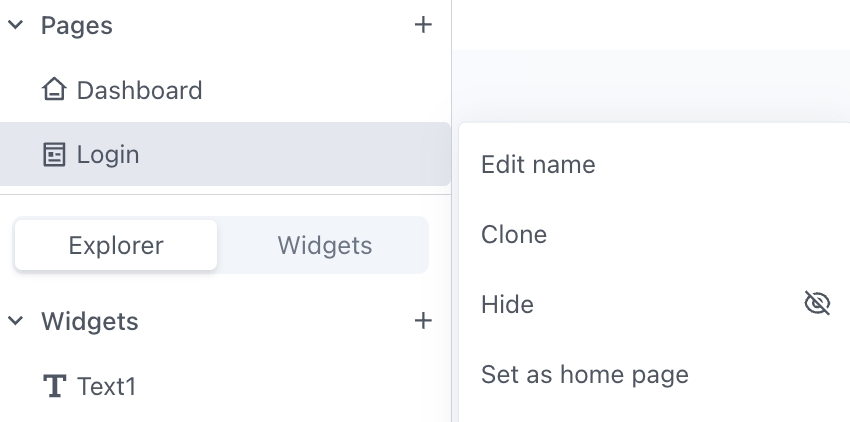
Set as home page -
Select the Menu icon (three dots) in other pages, and the select Hide to hide other pages in your app. This prevents users from accessing other parts of the app without authentication.
Store user data
-
On the login screen, if the user has a valid access token redirect the user to the desired page. Create a JS object to handle sign-in, save the user details using the storeValue() function and navigate user to the desired page.
Example:
   signin: () =>{
   return sign_in.run()
     .then(data => {
      storeValue(key, user.data[key]);
     })
   })
     .then(() => navigateTo('Dashboard'));
 },
For any subsequent action by the user, pass the saved access to the corresponding API endpoint. If the token has expired, refresh the access token for the user to proceed further.
-
In the Form's property pane, set the onClick event of the Login button to invoke the API.
Refresh access token
To refresh access token, follow these steps:
-
Create a new API endpoint to call the token refresh endpoint provided by your authentication service. For OAuth services, you must send the refresh token to receive a new access token.
-
Create a JS object to check the token expiration and attempt to refresh it. To ensure token refresh happens seamlessly, you can set the function to run on page load before making an API call that requires authentication.
Example:
export default {
    refreshAccessToken: () => {
        // Retrieving the refresh token from the appsmith store
        const refreshToken = appsmith.store.refreshtoken;

        // Checking if a refresh token exists
        if (refreshToken) {
            // Executing the refresh API with the retrieved refresh token
            return refreshAPI.run({ refreshtoken: refreshToken })
                .then(newTokens => {
                    // Updating the access token in the appsmith store
                    storeValue('accesstoken', newTokens.accesstoken);

                    // Checking if a new refresh token is provided and updating it
                    if (newTokens.refreshtoken) {
                        storeValue('refreshtoken', newTokens.refresh_token);
                    }
                })
                .catch(error => {
                    console.log('Error refreshing token:', error);
                });
        }
    }
};
Log out users
In the previous steps, you used the access token stored in the Appsmith store in a query that shows whether the user is authenticated. To remove their ability to be authenticated and see secure data, you should revoke the token and clear it from the Appsmith store so that they need to log in again if they want to get a new one. To do this, follow this steps:
- Call revoke API to revoke access token.
- To clear that user data from the store, use the Clear store() action selector on click of sign out.
- Navigate the user to the LoginPage, where the user must log in again to see your App's home page.