AD FS (Windows Server 2025)
This guide connects self-hosted Appsmith to Active Directory Federation Services (AD FS) on Windows Server 2025 using SAML 2.0. Users sign in with their Windows Active Directory accounts. AD FS authenticates the user and sends a signed SAML response to Appsmith through the browser.
AD FS is an on-premises identity provider. For Microsoft's cloud identity provider, use the Microsoft Entra ID SAML guide.
This procedure was validated with Appsmith Airgap v2.6.0 and AD FS on Windows Server 2025, backed by Windows Server Active Directory. Validation covered a successful SAML login with an AD test user. Screens and generated SAML endpoints can differ in other versions; always copy the values shown by your Appsmith instance.
Prerequisites
Complete these steps before creating the AD FS relying-party trust:
- Install self-hosted Appsmith with a license that includes SAML SSO. See the installation guides.
- Deploy AD FS on Windows Server 2025 and connect it to your Active Directory domain. You need access to AD FS Management and permission to create relying-party trusts and claim rules. Deploying a domain controller or an AD FS farm is outside this guide; see Microsoft's AD FS lab setup if you are building a test environment.
- Configure Appsmith at its final HTTPS address, such as
https://appsmith.example.com. Install its certificate using the existing Custom Domain and SSL guide. Set Admin Settings > Configuration > Appsmith Base URL to that same HTTPS address before configuring SAML. - Configure AD FS with its own HTTPS service name and certificate, such as
https://fs.example.com. - Verify that the browser used for login can resolve and reach both services and trusts both HTTPS certificate chains. Each computer has its own certificate trust store. Trusting a lab CA on an AD FS server does not make a separate workstation trust it. For a private CA, follow your organization's certificate-distribution procedure. See Custom CA Root Certificate for Appsmith's server trust configuration.
- Verify that each test user's E-mail field is populated in Active Directory. In Active Directory Users and Computers, open the user and check Properties > General > E-mail. The claim rules below read this attribute; a user logon name alone does not populate it.
- Keep access to an Appsmith administrator account that can use form login while setting up SAML. If replacing an existing SAML provider, disconnect it through Admin Settings > Authentication > SAML 2.0 before registering AD FS. Plan for the interruption to existing SAML sign-ins.
The AD FS wizard requires an HTTPS SAML WebSSO callback. Appsmith and AD FS need separate HTTPS certificates, each matching its own address. For an IP-based lab URL, the Appsmith certificate must contain that IP address in its Subject Alternative Name (SAN). A DNS-only certificate does not cover an IP address.
The wizard's optional Configure Certificate page is for SAML token encryption. It does not install an HTTPS certificate for Appsmith or AD FS. Complete HTTPS installation and trust first; do not bypass a browser certificate warning to validate the customer setup.
The screenshots use the lab Appsmith address https://10.0.0.33 and AD FS name fs.adfs.lab.test. Replace those with your deployment's addresses. The example.com addresses in the text are placeholders, not values to enter unchanged. You can use any supported browser on a computer that meets the DNS, connectivity, and certificate-trust prerequisites; Edge on the AD FS server is not required.
Get Appsmith's SAML addresses
- Open Appsmith at its final HTTPS address and sign in as an Appsmith administrator.
- Go to Admin Settings > Authentication and click Enable for SAML 2.0.
- Copy the Redirect URL and Entity ID from the configuration page. Leave the page open; you will enter AD FS metadata later.
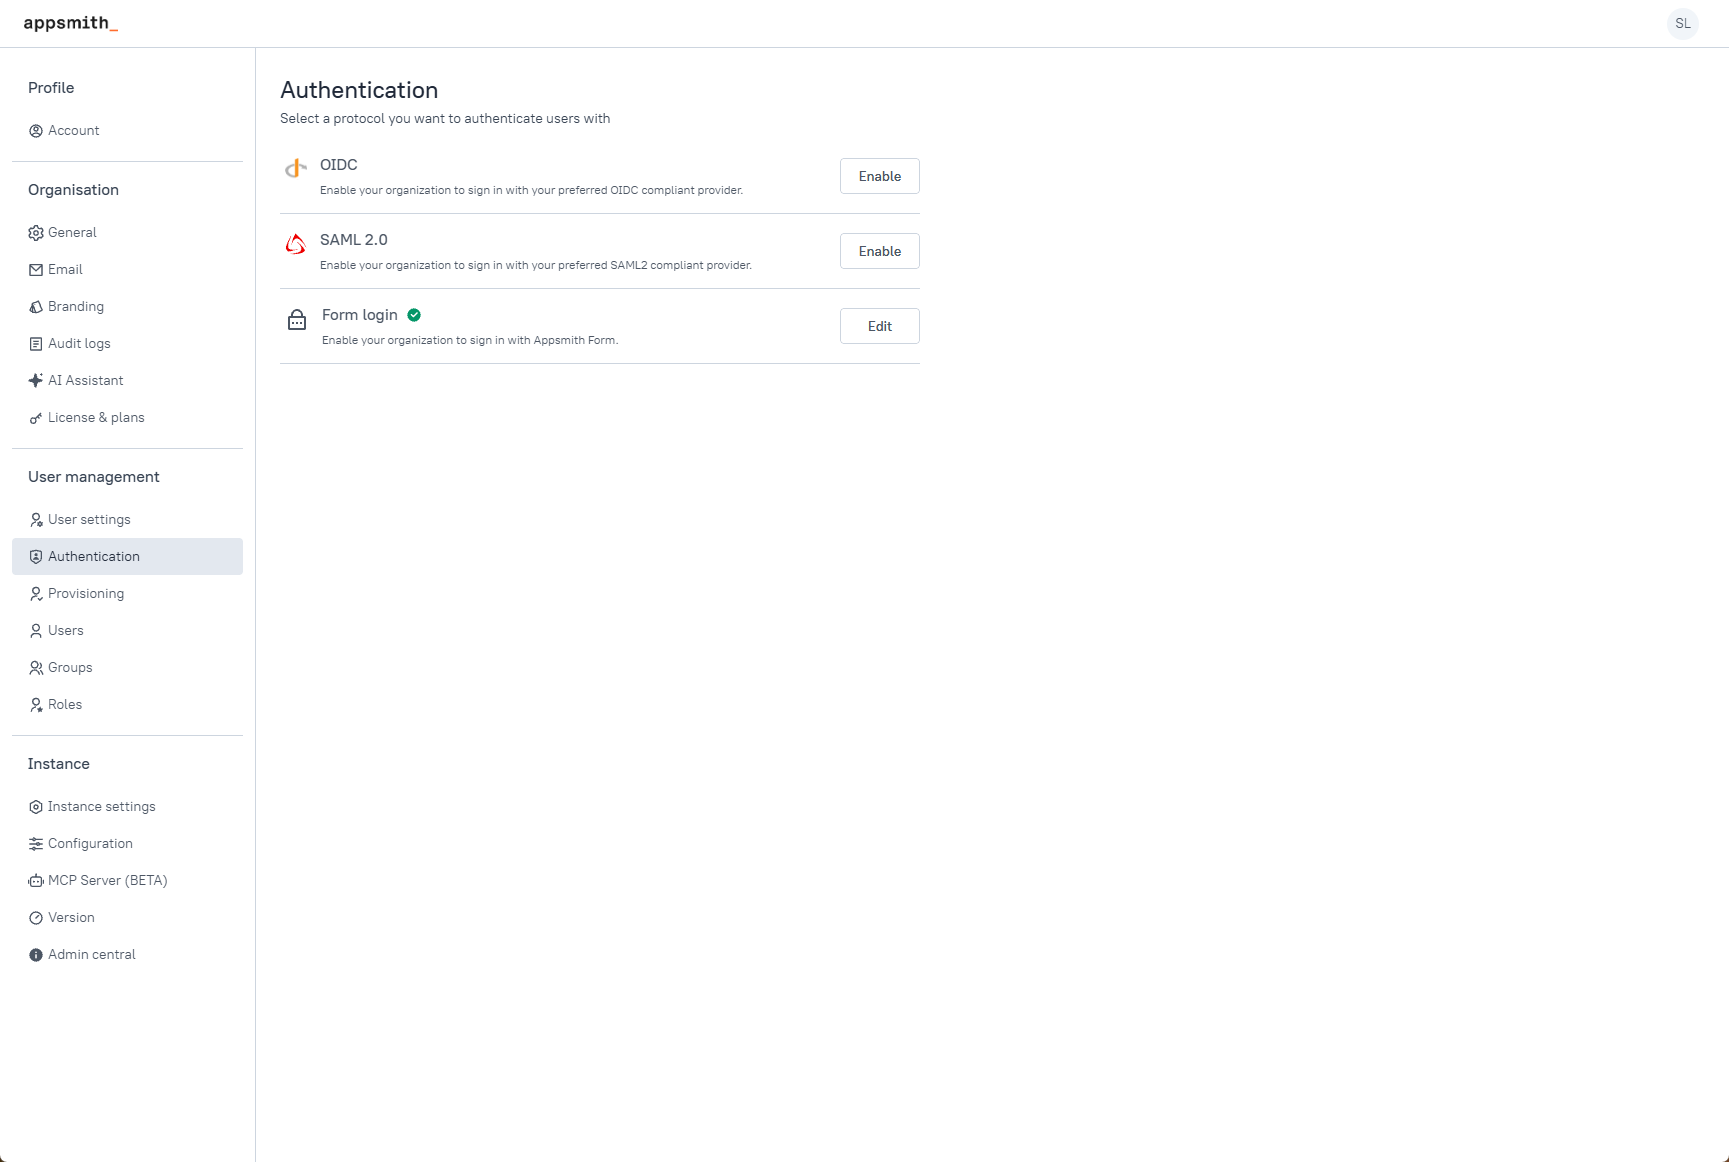
Use each value in the corresponding AD FS field:
| Appsmith field | AD FS field | Example from the validated version |
|---|---|---|
| Redirect URL | Relying party SAML 2.0 SSO service URL | https://appsmith.example.com/auth/realms/appsmith/broker/saml/endpoint |
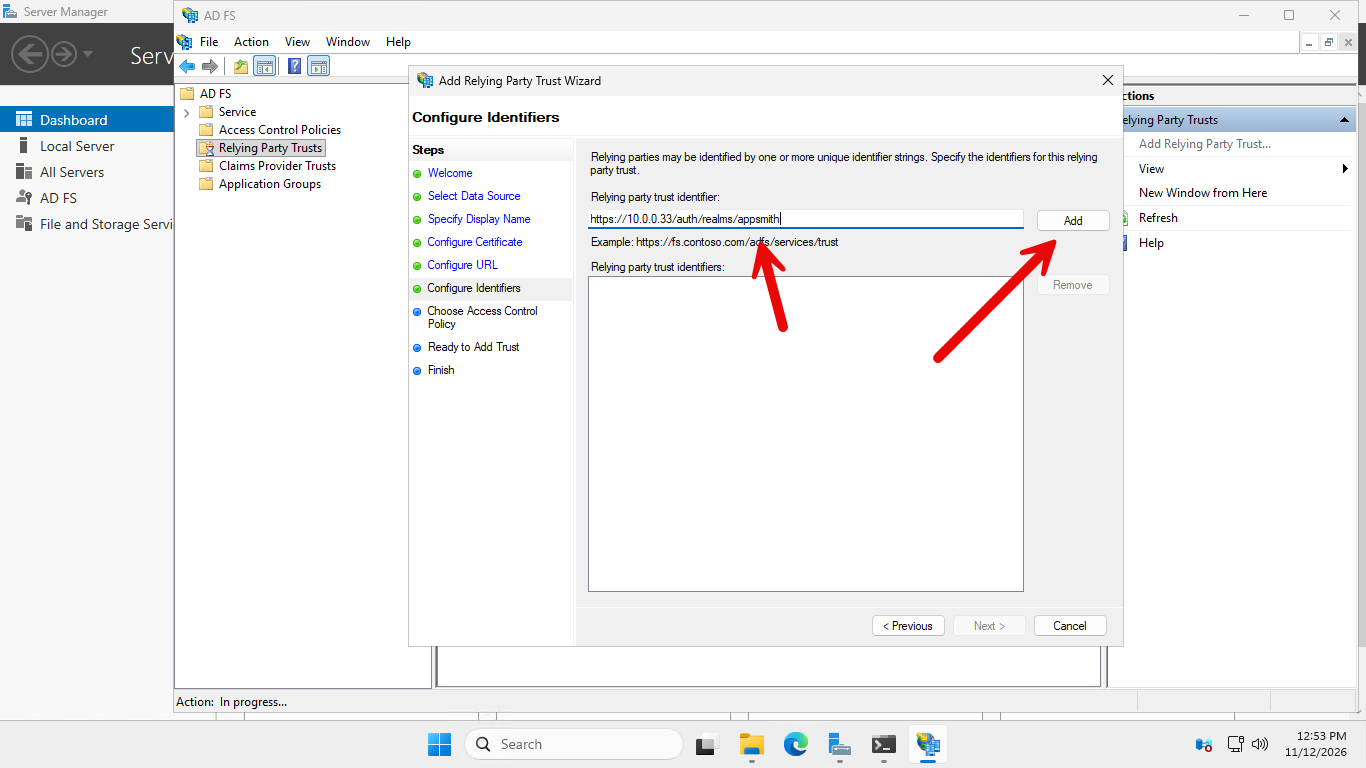
| Entity ID | Relying party trust identifier | https://appsmith.example.com/auth/realms/appsmith |
Copy the full values, including the scheme, hostname, port if present, and path. Do not enter the callback URL as the Entity ID. Avoid localhost when the login browser is on another machine.
Create the AD FS relying-party trust
On the Windows Server 2025 AD FS server:
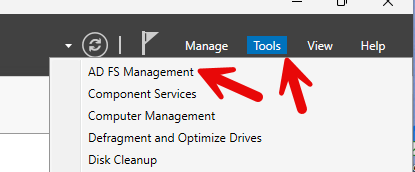
- Open Server Manager > Tools > AD FS Management.
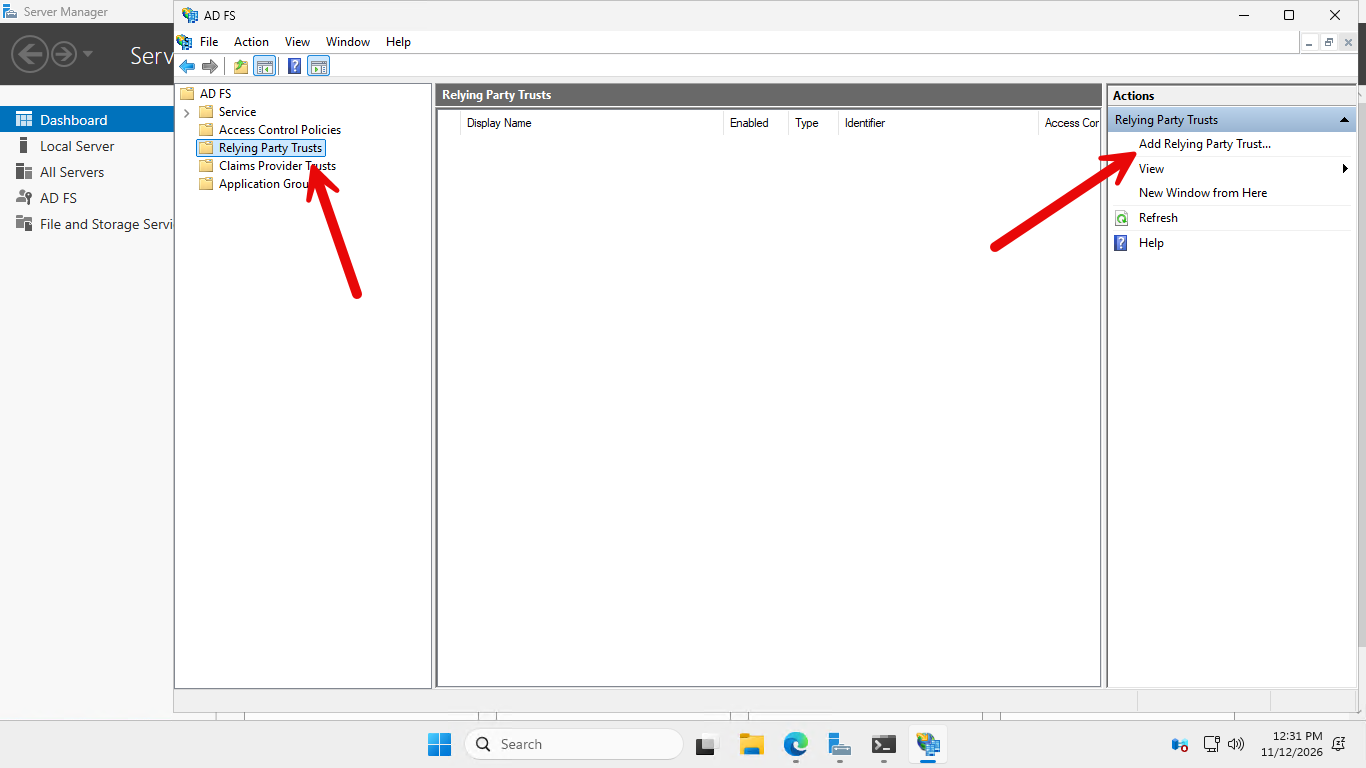
- Select Relying Party Trusts, then click Add Relying Party Trust.
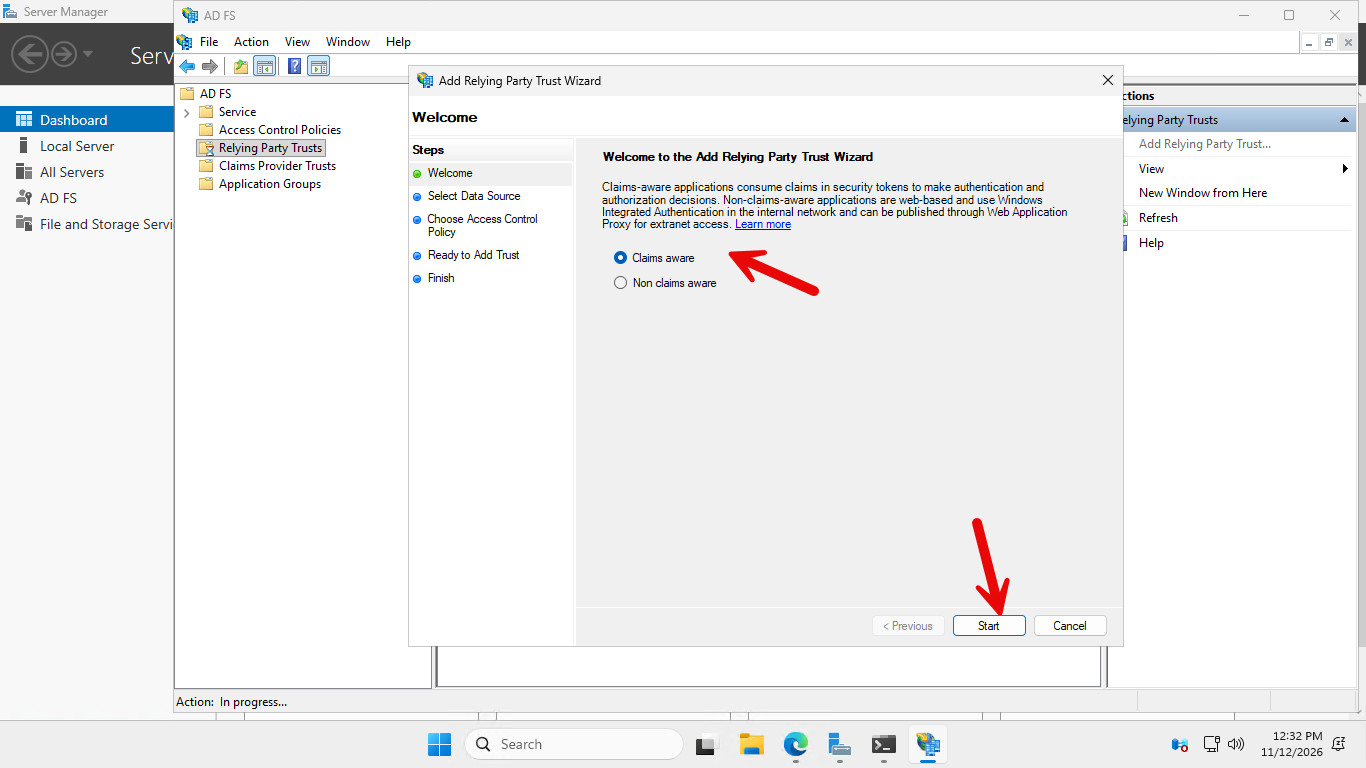
- On Welcome, select Claims aware, then click Start.
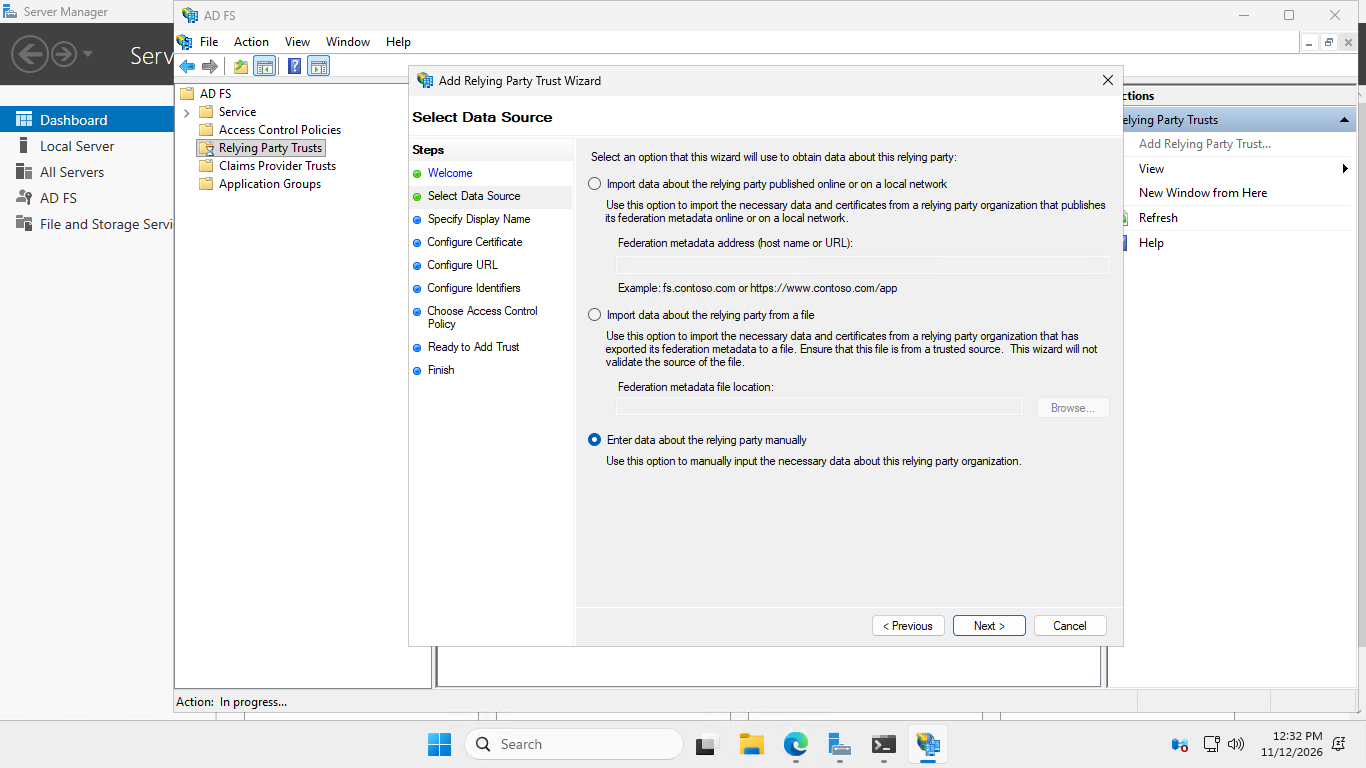
- On Select Data Source, choose Enter data about the relying party manually, then click Next.
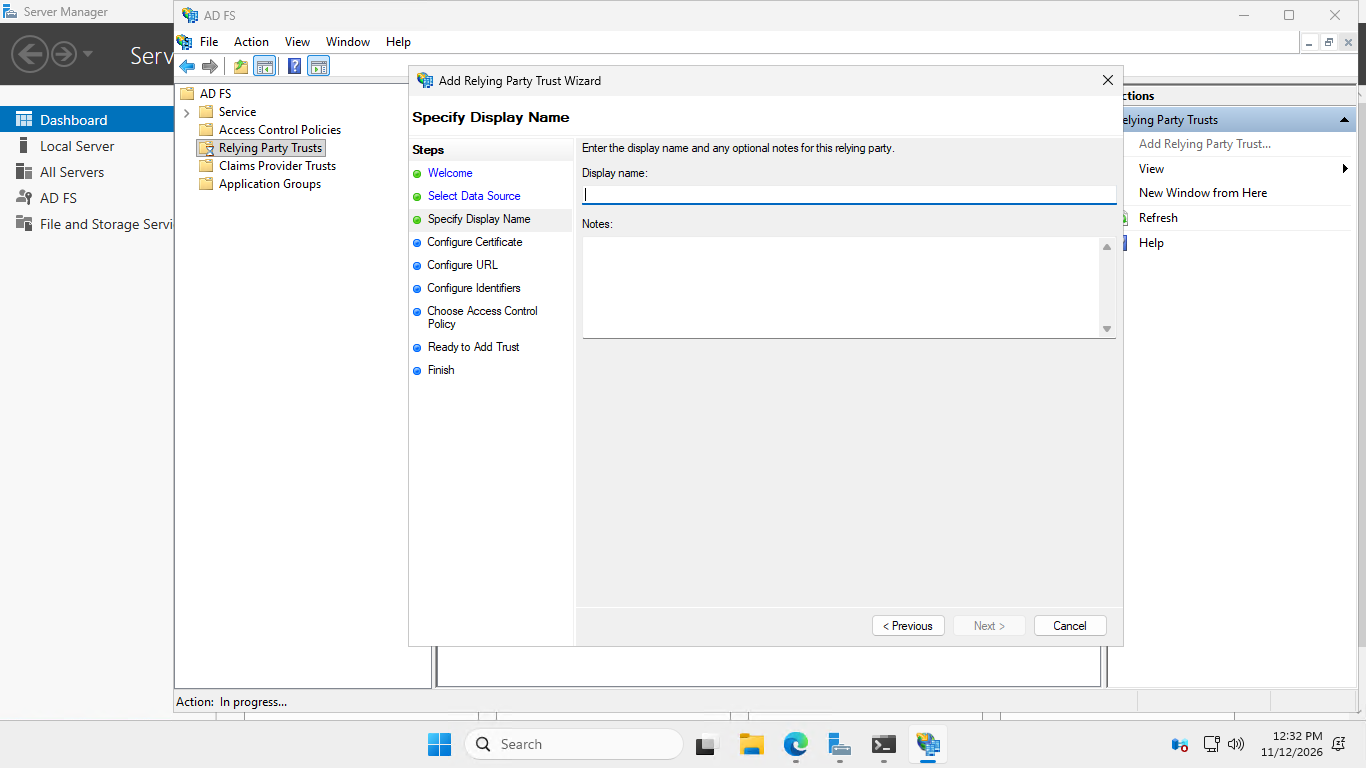
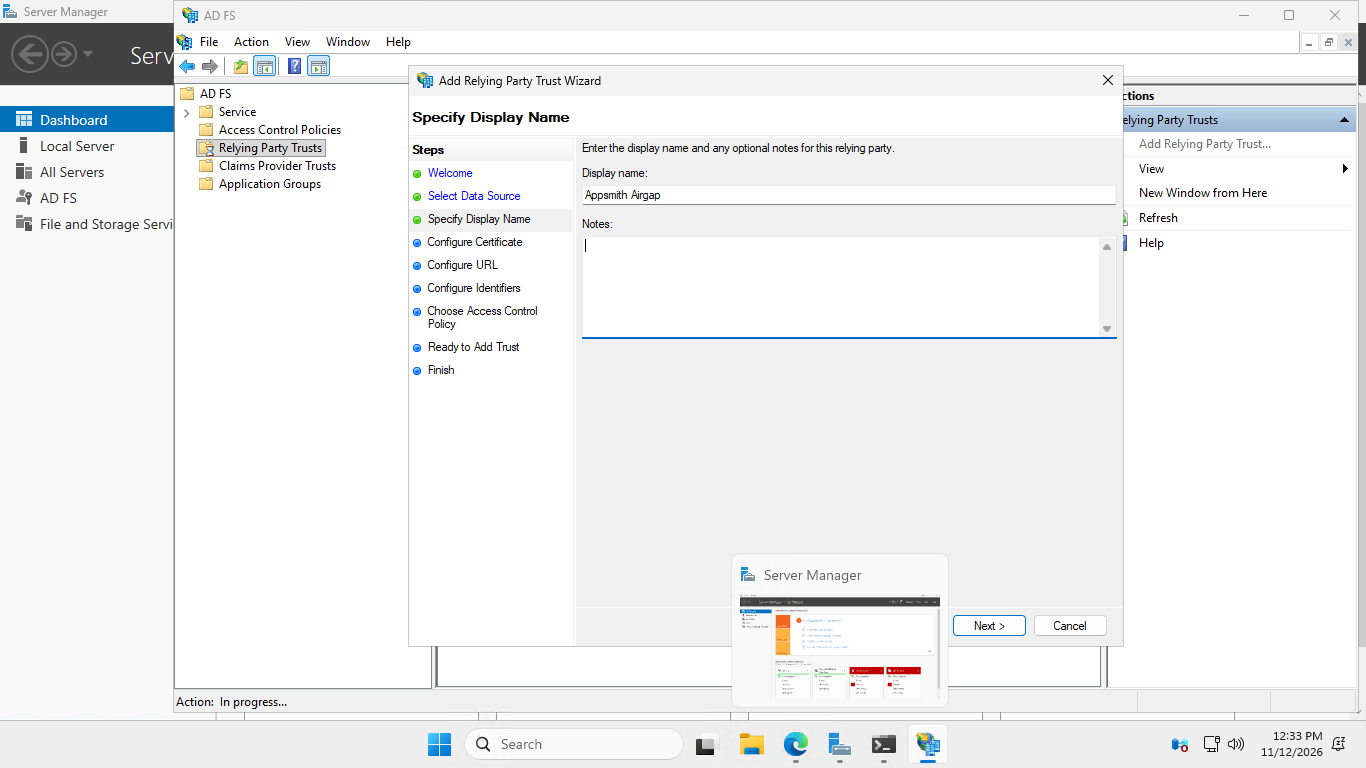
- On Specify Display Name, enter a recognizable name, such as
Appsmith, then click Next. The screenshots useAppsmith Airgap.
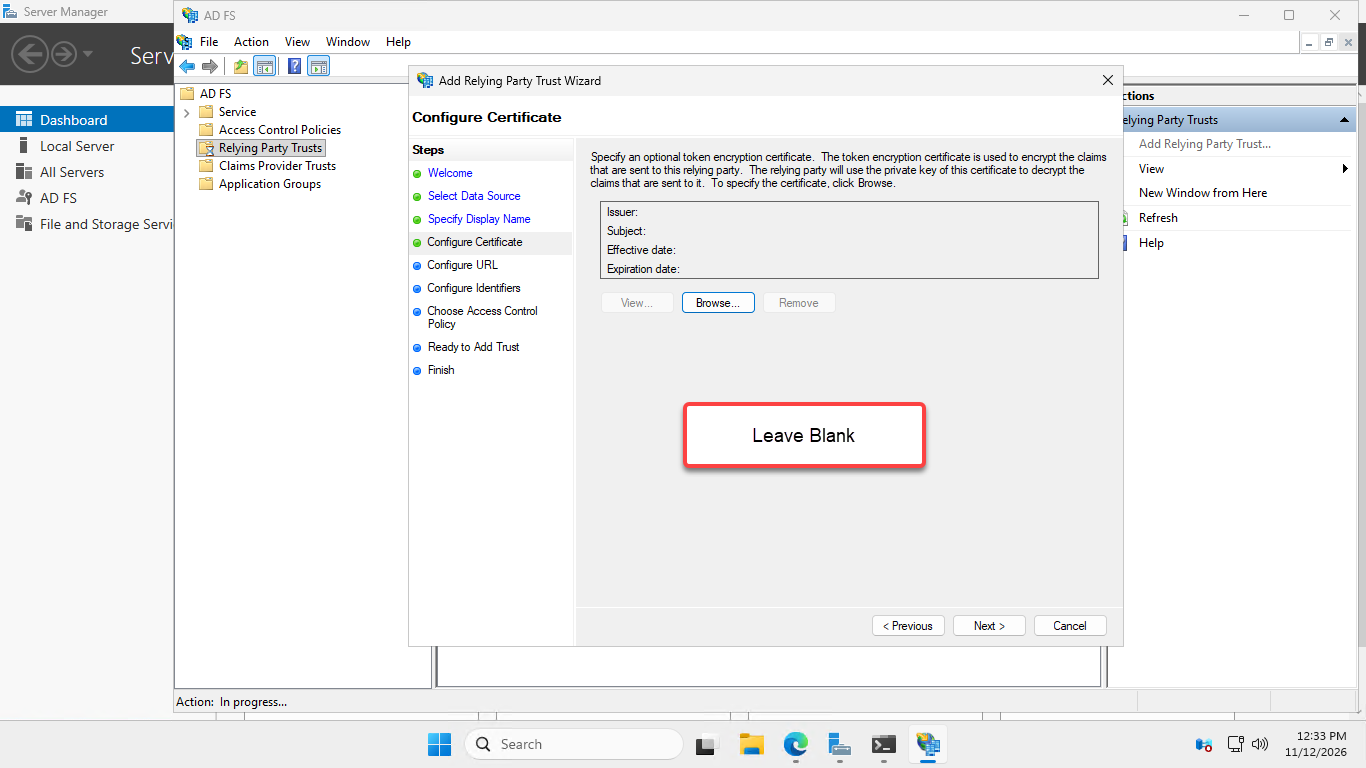
- On Configure Certificate, leave the optional token-encryption certificate blank for this signed, unencrypted assertion flow, then click Next. The HTTPS certificates from the prerequisites must already be installed.
- On Configure URL, select Enable support for the SAML 2.0 WebSSO protocol. In Relying party SAML 2.0 SSO service URL, paste the Redirect URL copied from Appsmith. Leave WS-Federation unselected for this SAML integration and click Next.
- On Configure Identifiers, paste Appsmith's Entity ID into Relying party trust identifier. Click Add so it appears in the identifiers list, then click Next.
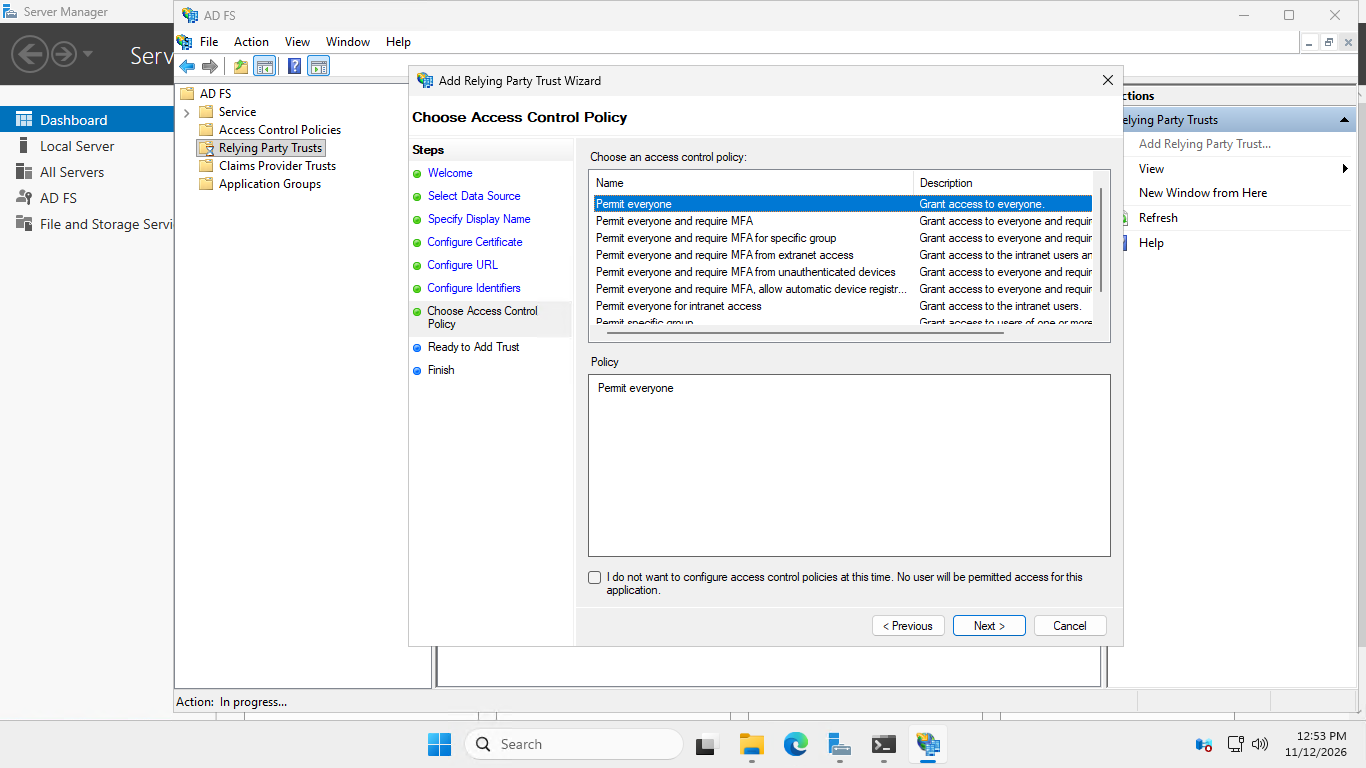
- On Choose Access Control Policy, select a policy that permits the intended AD users or groups, then click Next. The screenshot shows Permit everyone, which was used for the lab. Use a policy appropriate for your organization's access requirements.
- Review the values on Ready to Add Trust, then click Next.
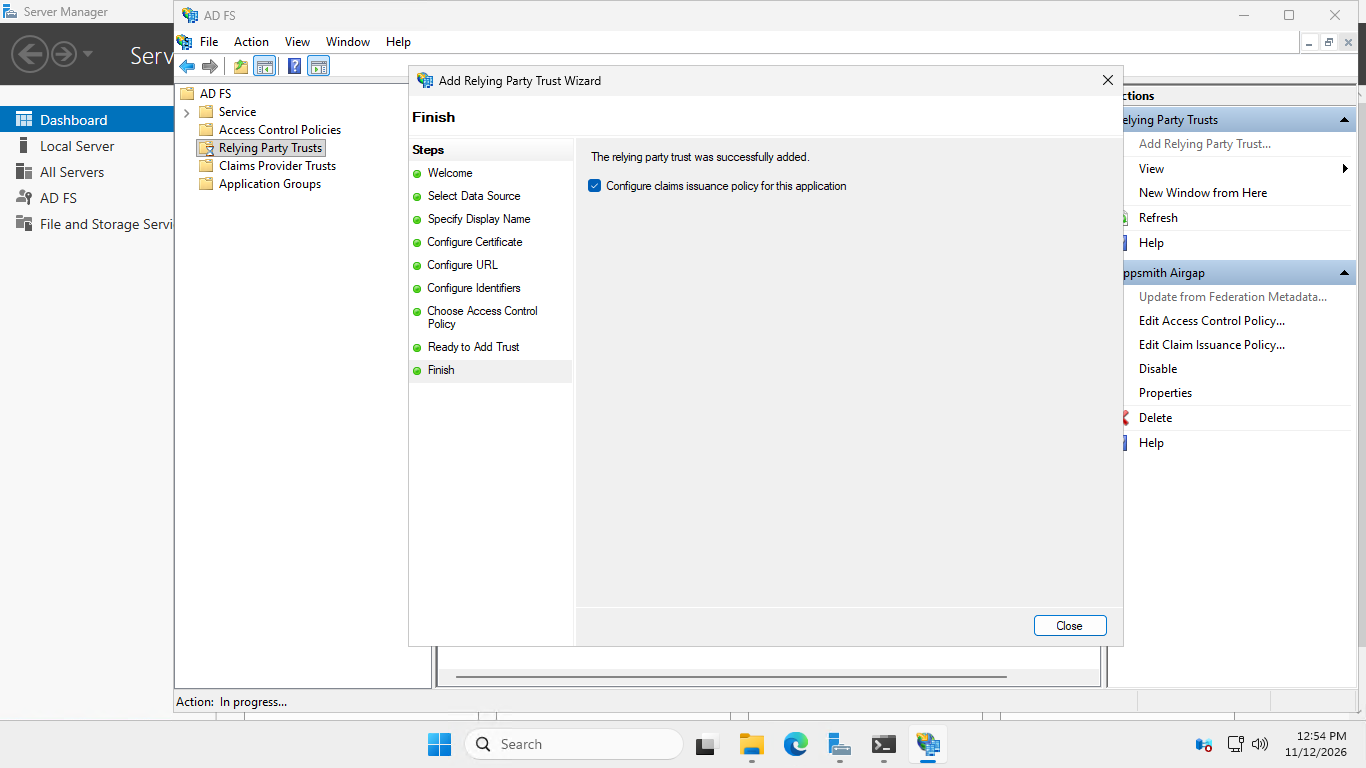
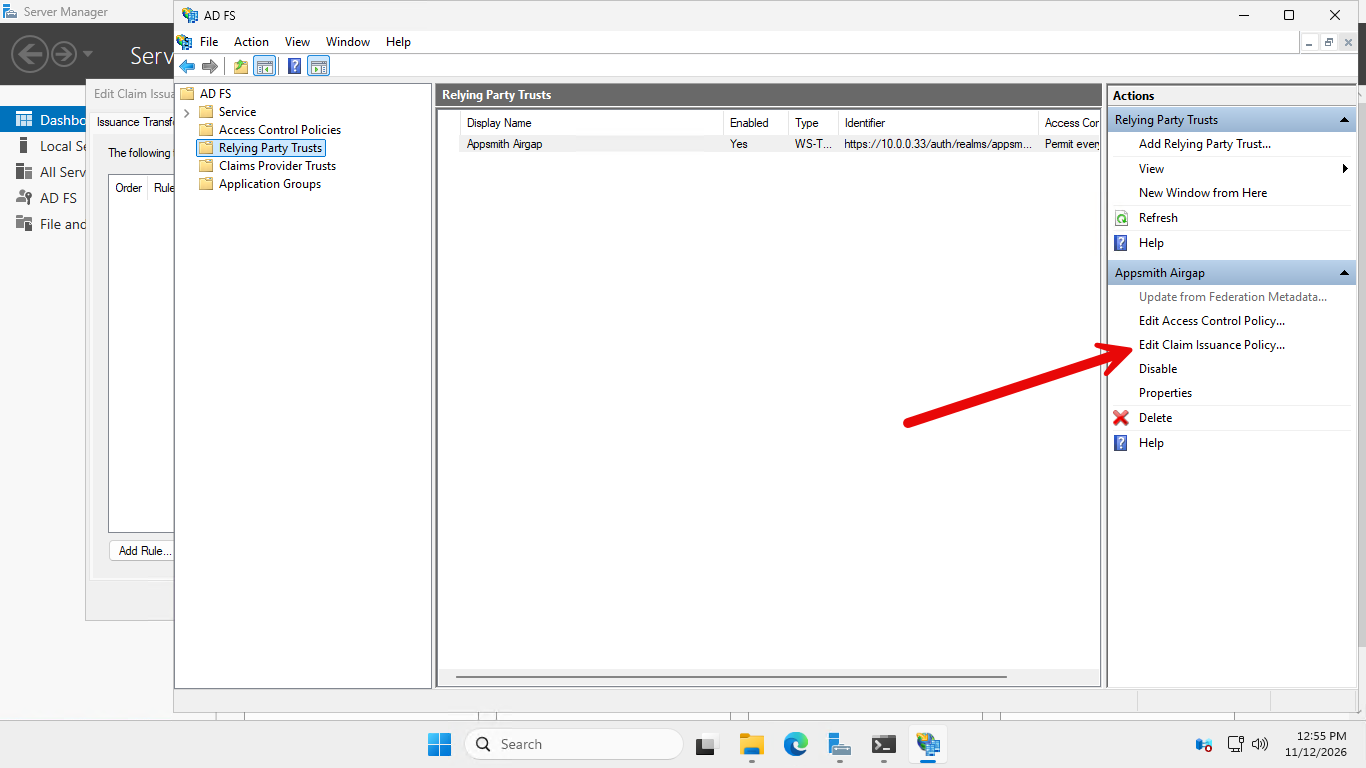
- On Finish, leave Configure claims issuance policy for this application selected and click Close. If the claim-policy window does not open, right-click the new trust in Relying Party Trusts and select Edit Claim Issuance Policy.
Configure the email and Name ID claim rules
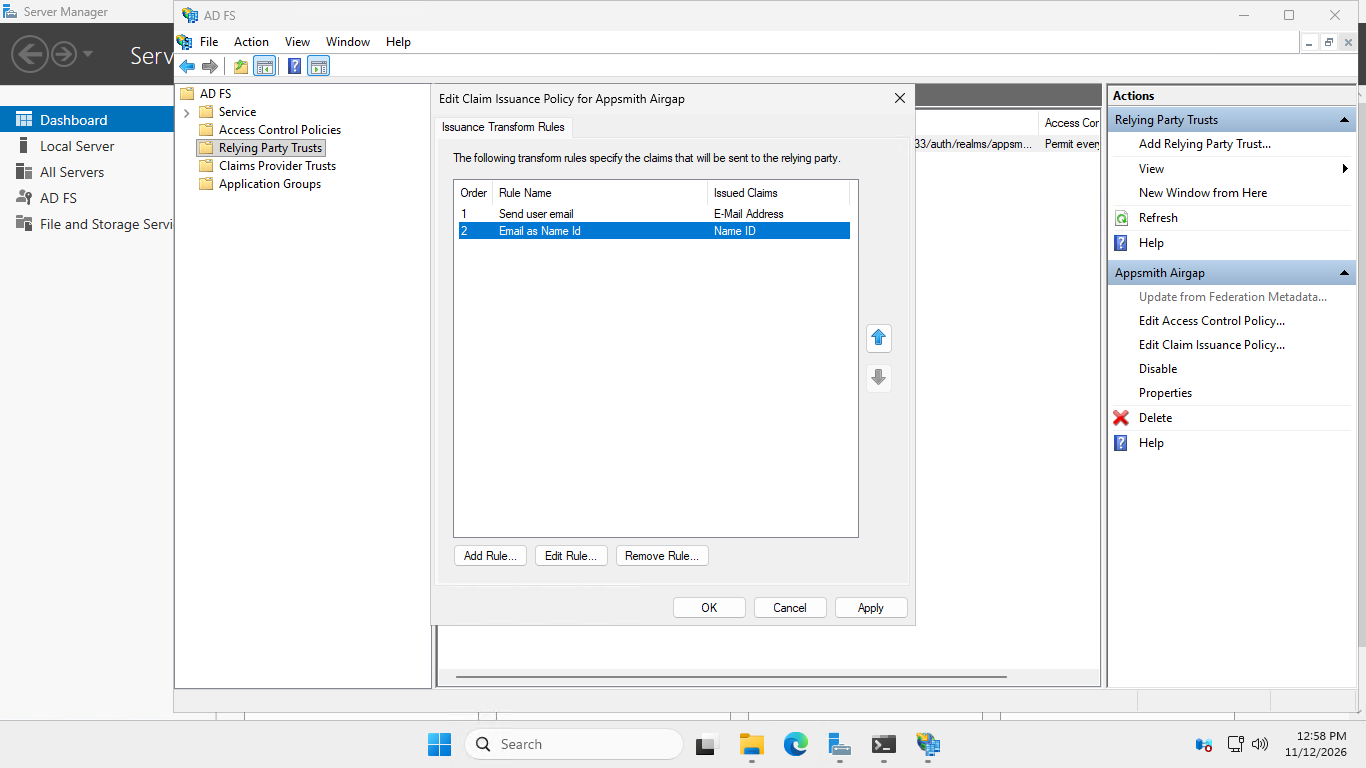
Create the following two rules under Issuance Transform Rules, in this order. The first reads the user's AD email attribute. The second sends that email as the SAML Name ID used to identify the user.
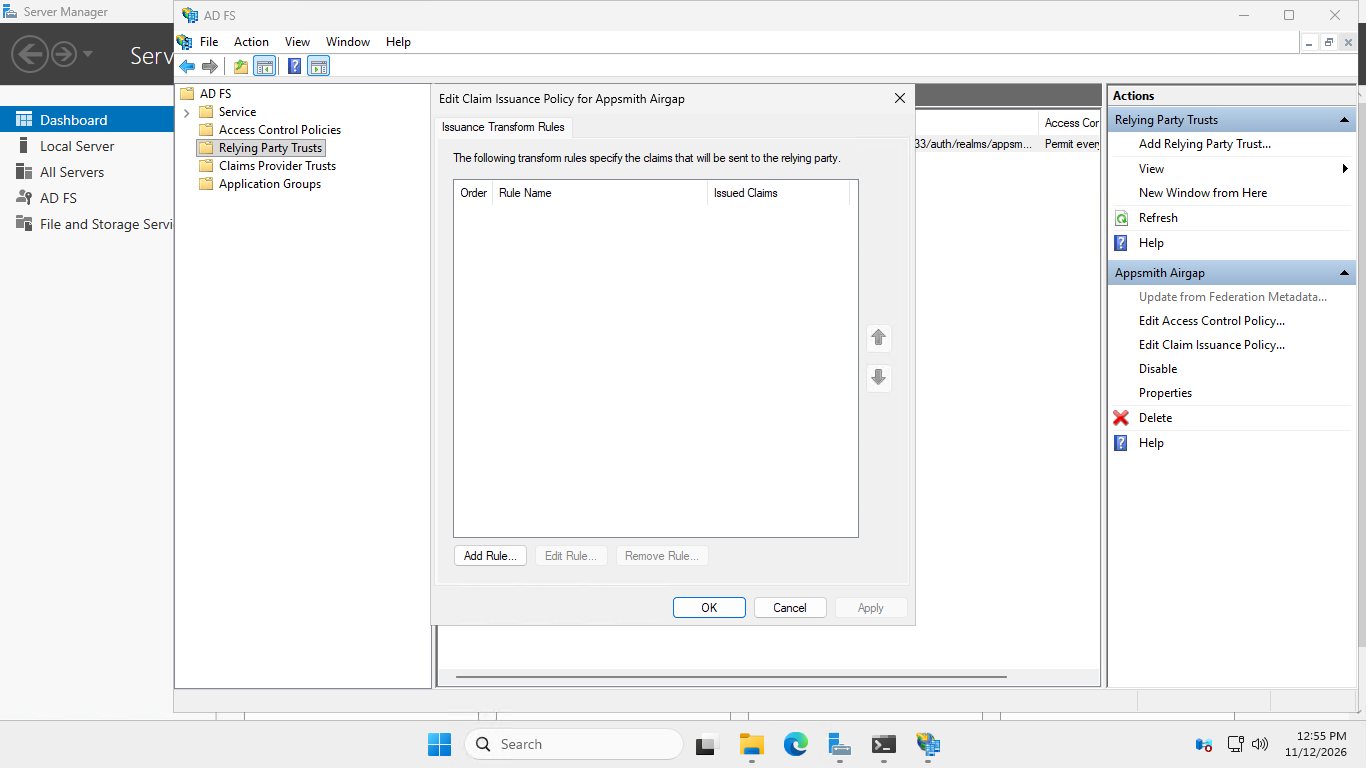
Send the user's email
- Click Add Rule.
- Select Send LDAP Attributes as Claims, then click Next.
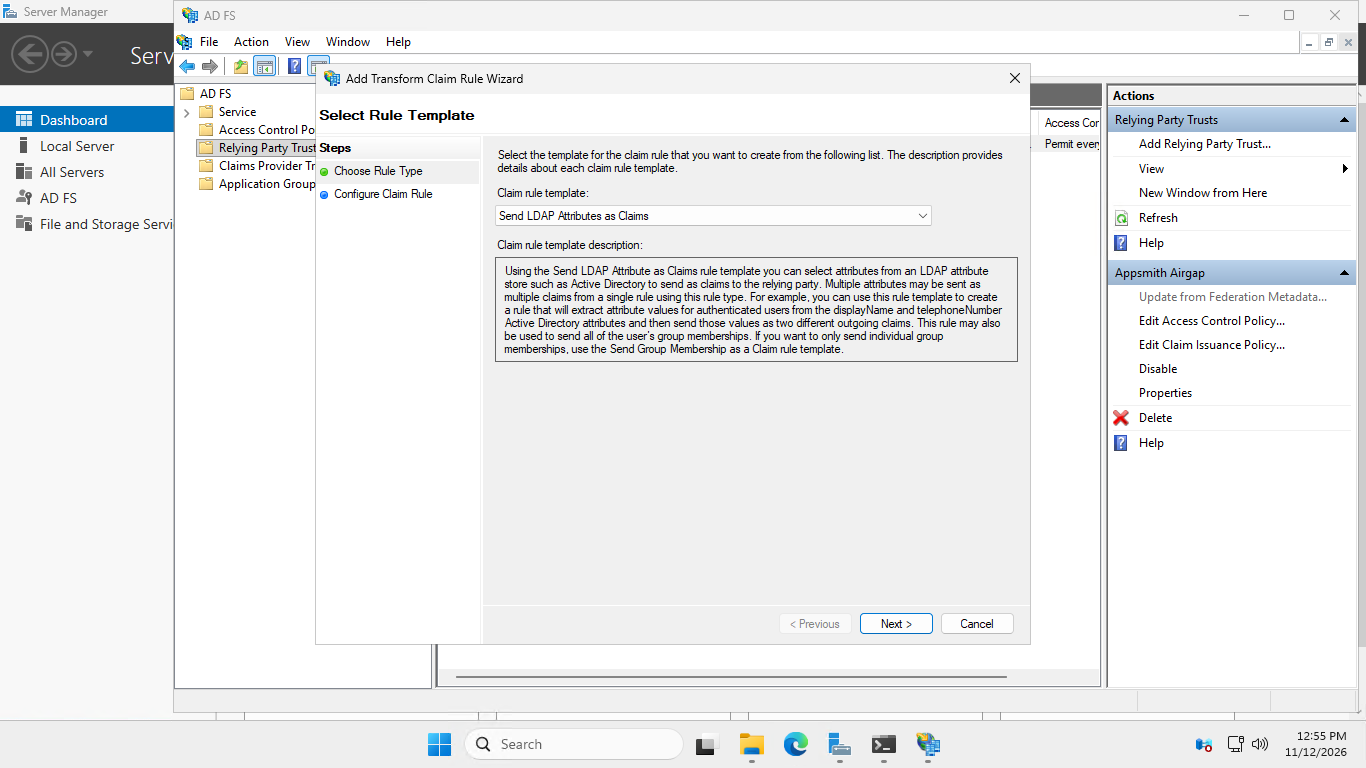
- Set these values:
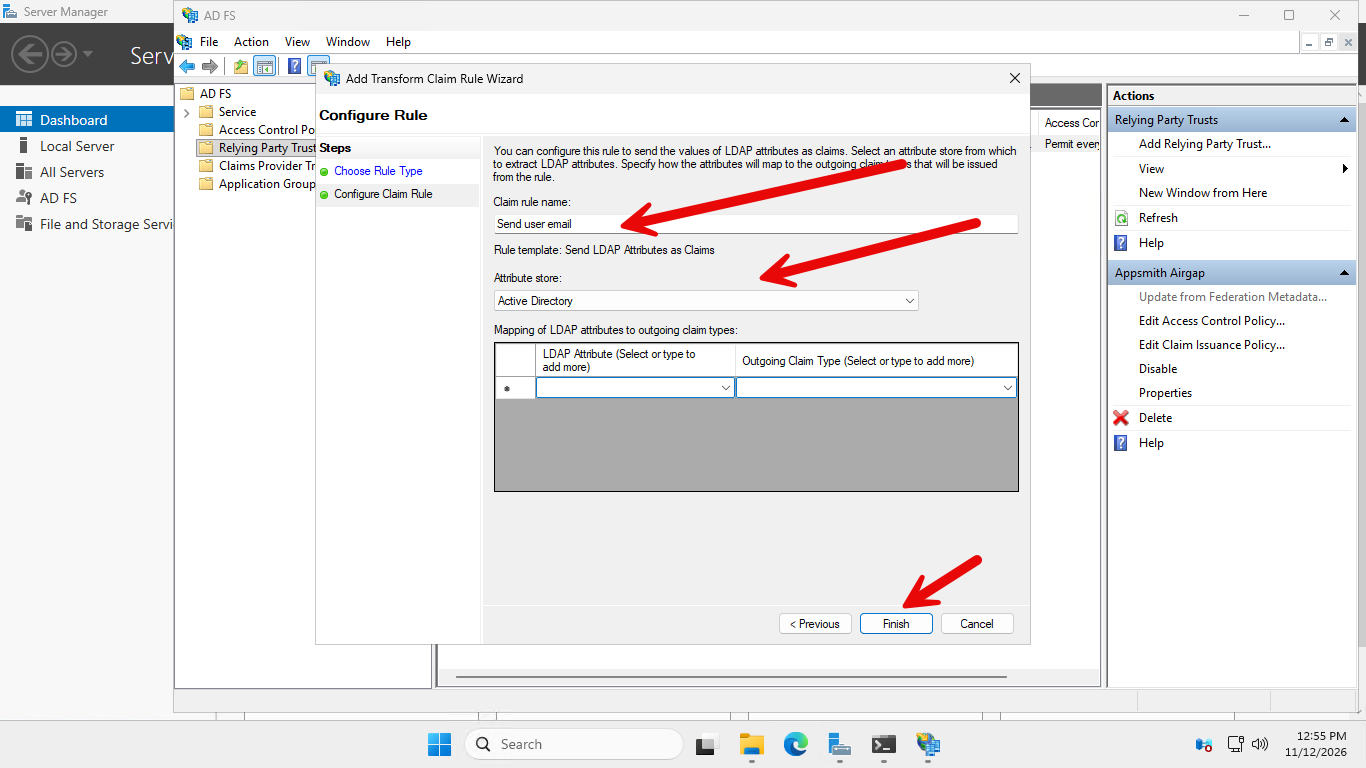
| Field | Value |
|---|---|
| Claim rule name | Send user email |
| Attribute store | Active Directory |
| LDAP Attribute | E-Mail-Addresses |
| Outgoing Claim Type | E-Mail Address |
- Click Finish.
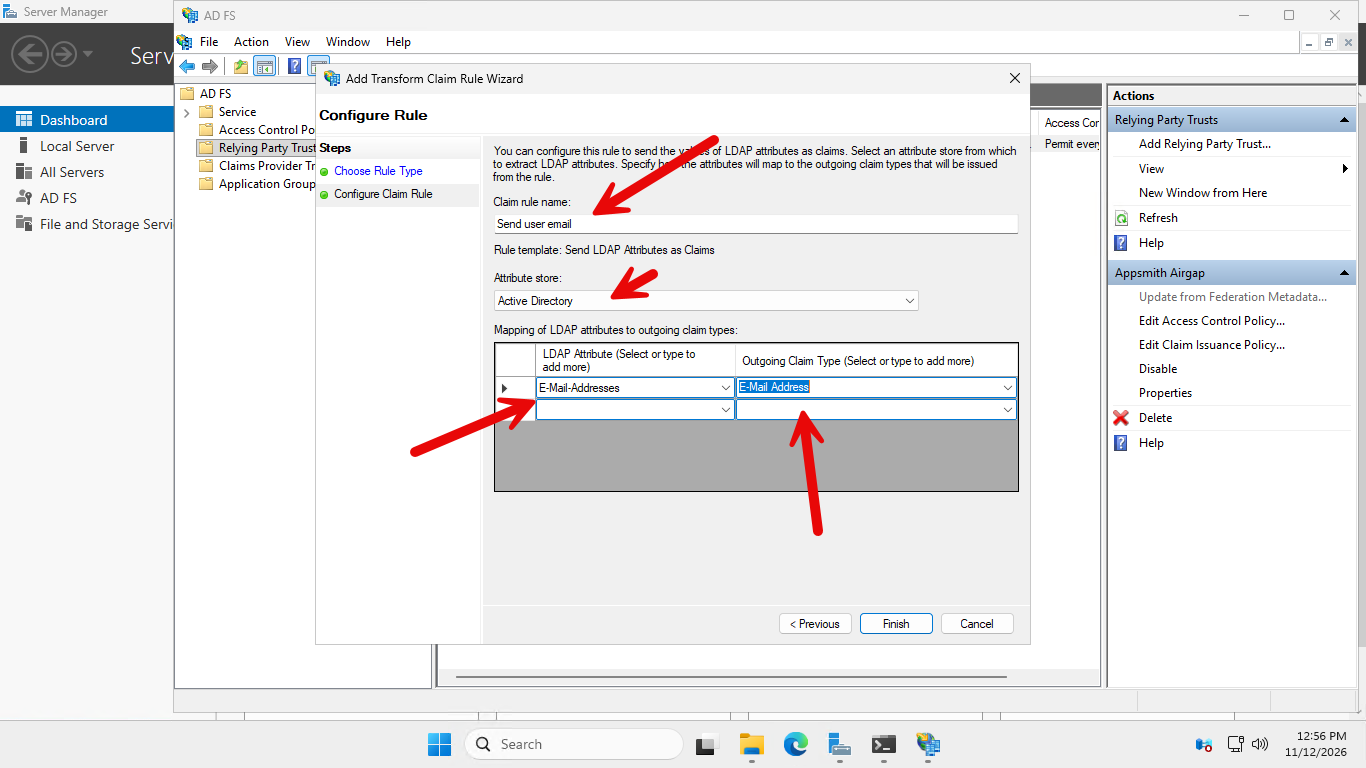
Send the email as Name ID
- Click Add Rule again.
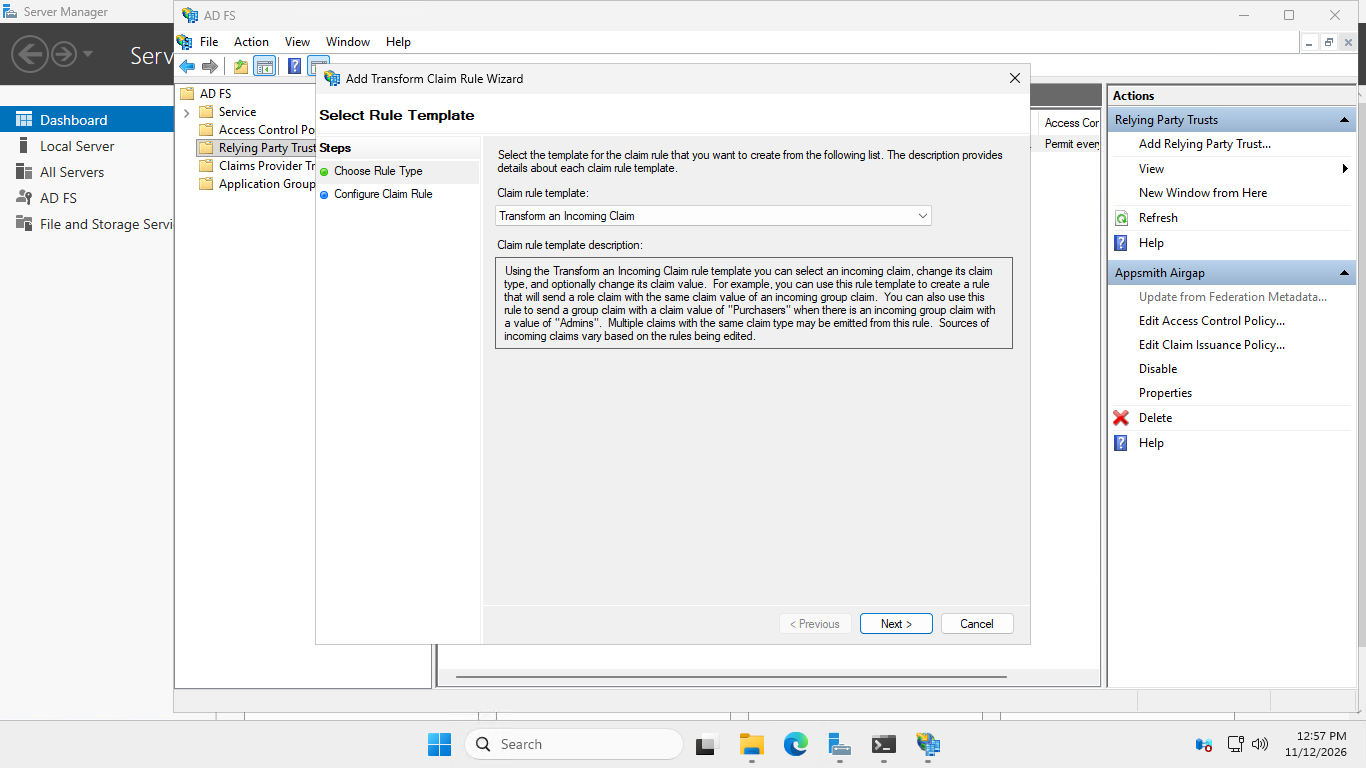
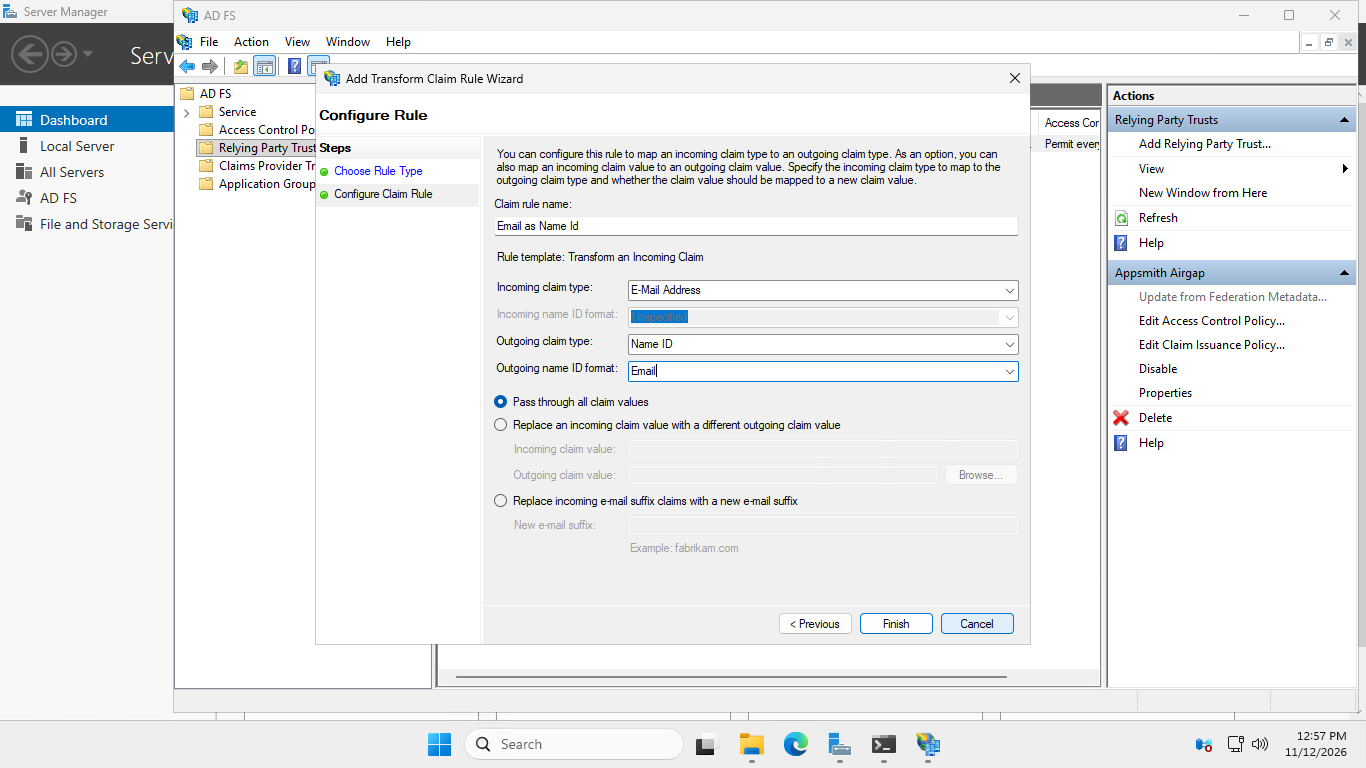
- Select Transform an Incoming Claim, then click Next.
- Set these values:
| Field | Value |
|---|---|
| Claim rule name | Email as Name ID |
| Incoming claim type | E-Mail Address |
| Outgoing claim type | Name ID |
| Outgoing name ID format | Email |
| Claim values | Pass through all claim values |
- Click Finish. Verify that Send user email is above Email as Name ID, then click Apply > OK.
AD FS uses its token-signing certificate to sign assertions. Keep signature validation enabled. This token-signing certificate is separate from the HTTPS certificate used to secure the AD FS website. For background, see Microsoft's guidance on LDAP claim rules and claim transformations.
Register AD FS in Appsmith
The validated setup imports the AD FS metadata as XML through Appsmith's SAML settings.
Find the federation metadata URL
Find the address in AD FS Management before opening or downloading the XML:
-
Open AD FS Management > Service > Endpoints.
-
Under Metadata, locate the entry with type Federation Metadata. Its path is normally
/FederationMetadata/2007-06/FederationMetadata.xml. Verify that the endpoint is enabled. Follow your organization's policy before changing endpoint exposure. -
To find the hostname, select Service and open Edit Federation Service Properties. Read Federation Service name, for example
fs.example.com. This is the service name configured for AD FS, not necessarily the Windows server's computer name. -
Combine
https://, the federation service name, and the metadata path:https://fs.example.com/FederationMetadata/2007-06/FederationMetadata.xml
In the screenshot lab, the service name is fs.adfs.lab.test, so the metadata URL is https://fs.adfs.lab.test/FederationMetadata/2007-06/FederationMetadata.xml.
The Federation Service identifier, commonly ending in /adfs/services/trust, identifies the IdP. It is not the metadata download URL. See Microsoft's AD FS endpoint mapping for where these values appear in AD FS Management.
Import the metadata XML
-
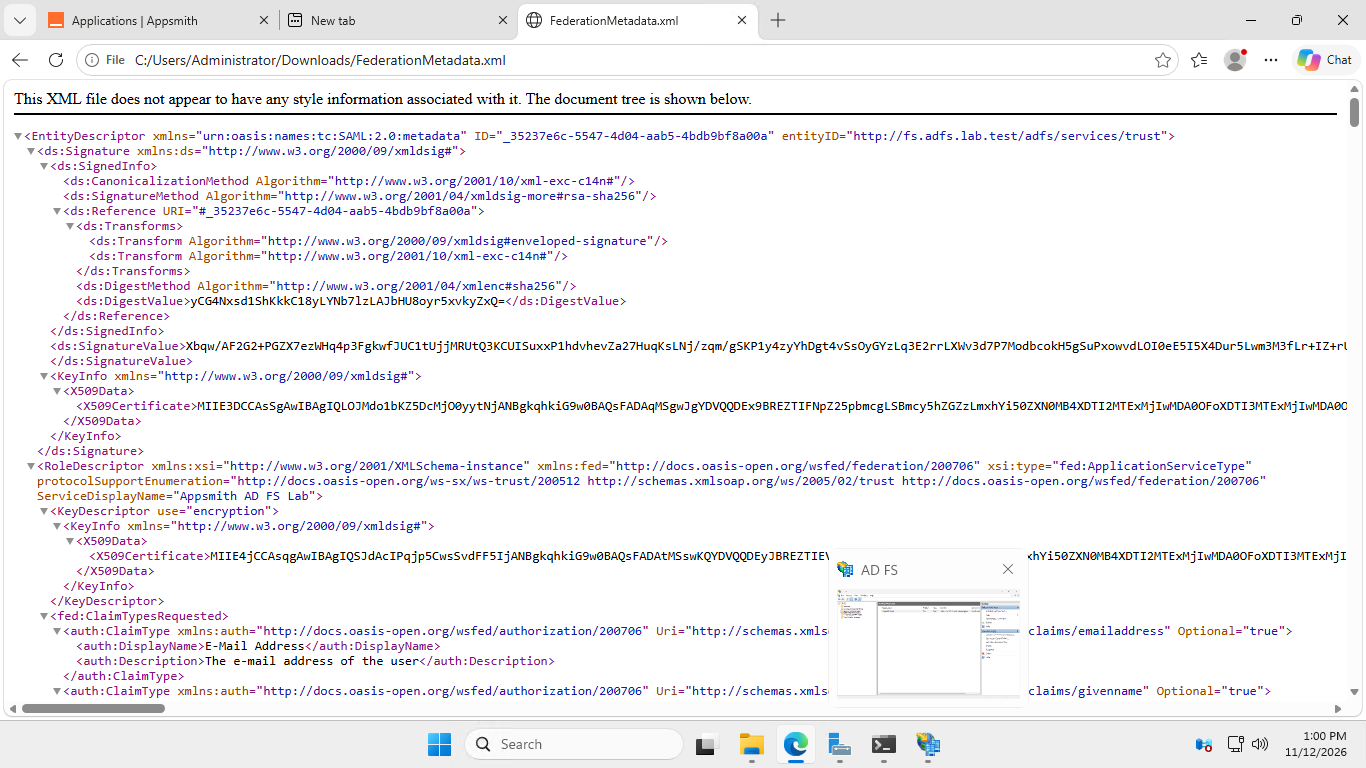
In a browser that trusts AD FS, open its federation metadata URL. Replace the hostname with your federation service name:
https://fs.example.com/FederationMetadata/2007-06/FederationMetadata.xml -
Copy the entire XML document. If the browser downloads it, open the file in a text editor. Exclude the browser's message about missing style information and include the opening and closing XML elements. Use metadata obtained from your trusted AD FS service or administrator.
- Return to Appsmith > Admin Settings > Authentication > SAML 2.0.
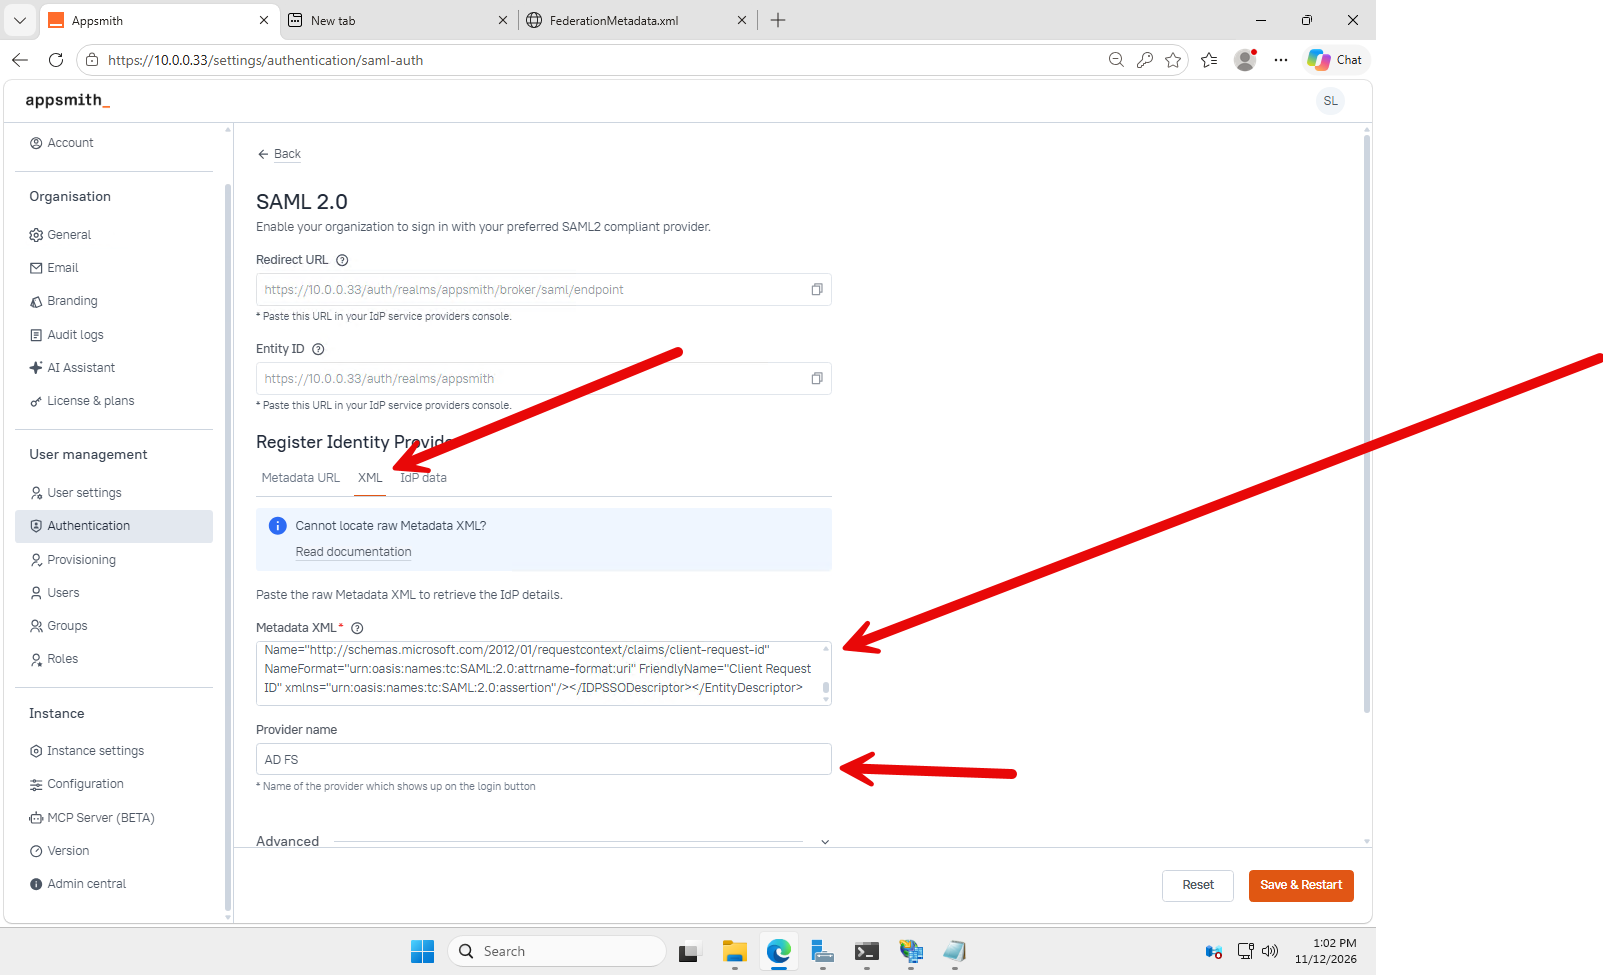
- Under Register Identity Provider, select the XML tab and paste the document into Metadata XML. The Metadata URL field expects a URL, not XML content.
- Set Provider name to
AD FS, or another label that users will recognize on the login button. - Leave Advanced > Claims blank for this basic email-based login. The two AD FS rules already provide the email and Name ID. This section is for additional custom claims, not the AD FS rule definitions.
- Click Save & Restart and wait for Appsmith to become available again.
Appsmith also accepts an AD FS Metadata URL. For this method, Appsmith's server must be able to resolve and reach the AD FS HTTPS endpoint and trust its certificate chain. A successful fetch in your browser does not prove the container has the same DNS and trust configuration. Importing XML avoids that metadata fetch; the browser still needs to reach and trust AD FS during login.
Verify login
- Keep a working Appsmith administrator session available. Close any existing private browsing windows, then open a fresh private window in a browser that meets the prerequisites.
- Open Appsmith's final HTTPS address and select the SAML login button with the provider name you configured, such as Sign in with AD FS.
- Confirm that the browser reaches your AD FS service.
- Sign in with an authorized AD test user, such as
testuser@example.com, and that user's AD password. - After the browser returns to Appsmith, open the user profile and verify that the email matches the test user's AD E-mail attribute.
A successful return to the intended Appsmith account confirms the SAML login. A new user may have no workspace or application access; assign the required Appsmith roles separately. This guide does not configure automatic provisioning or group-to-role synchronization.
AD FS may use Windows Integrated Authentication and select the current Windows account automatically. A private window does not necessarily force a username prompt. Confirm the returned identity and use the intended Windows test session or your organization's AD FS authentication policy when testing a different user.
Troubleshooting
| Symptom | What to check |
|---|---|
| The AD FS wizard rejects the WebSSO URL because it uses HTTP | Complete Appsmith HTTPS setup, set its final Base URL, reopen the SAML page at that HTTPS address, and copy its updated Redirect URL and Entity ID. |
The browser reports NET::ERR_CERT_AUTHORITY_INVALID | Check the issuing CA for the service named in the warning. Trust the appropriate CA chain on the computer running that browser. AD FS and Appsmith can use different CAs. On Windows, inspect Trusted Root Certification Authorities > Certificates in certlm.msc. Restart the browser after updating trust. Do not install a private key as a trust certificate. |
| The browser reports a certificate name or date error | Verify that the certificate SAN covers the exact hostname or IP in the URL, that the certificate is valid, and that the client's clock is correct. |
| AD FS reports an unknown relying party or audience mismatch | Compare the relying-party identifier with the exact Entity ID shown in Appsmith. Confirm that you clicked Add in the wizard. |
| The response goes to the wrong host or callback | Compare the AD FS SAML WebSSO URL with Appsmith's complete Redirect URL. Check HTTPS, hostname, port, and path. Use the final public address consistently before enabling SAML. |
| Appsmith cannot obtain the user's email | Populate the user's AD E-mail field. Verify the E-Mail-Addresses mapping, that the email rule precedes the Name ID rule, and that the outgoing Name ID format is Email. |
| Pasting XML into Appsmith fails | Select the XML tab. Paste the complete metadata document, not a browser message or just the certificate text. |
| Metadata URL import fails but the URL opens in a browser | Check DNS, reachability, and certificate trust from Appsmith's server. Use trusted metadata XML if server-side retrieval is unavailable. |
| Login fails after an AD FS signing-certificate change | Obtain current AD FS metadata and update the provider through Appsmith's SAML settings. Keep signature validation enabled; the signing certificate is different from the HTTPS certificate. |
| Login succeeds as a different Windows user | Check whether AD FS used Windows Integrated Authentication. Verify the Appsmith profile rather than assuming a private window switched the Windows identity. |
| The user signs in but cannot access a workspace | Check Appsmith invitations, user settings, and role assignments separately from SAML authentication. |